


1. 람다함수를 이용한 서비리스 챗봇 만들기


2. 챗봇 구축 핸드온 실습
•
사전 준비 단계
python -m pip install --upgrade boto3 botocore
JavaScript
복사
python install -r requirements.txt
JavaScript
복사
•
10.lambda_chatbot_app.py 파일 생성
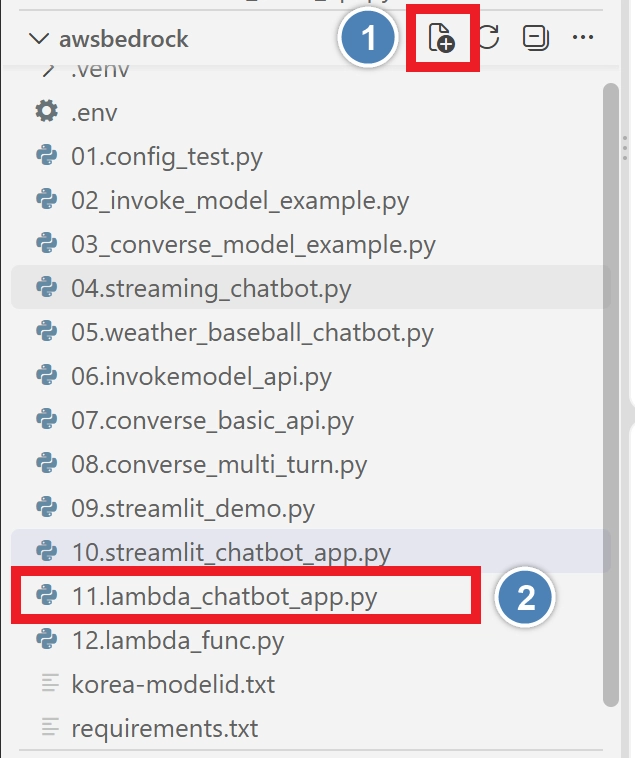
11.lambda_chatbot_app.py
JavaScript
복사
# ============================================================
# bedrock_chatbot.py
#
# Amazon Bedrock + Streamlit Chatbot
#
# 주요 기능
# ------------------------------------------------------------
# 1. Amazon Bedrock Converse API 사용
# 2. 사용자 질문 / Bedrock 답변 영역 구분
# 3. 새로운 질문을 하면 이전 질문/답변 제거
# ============================================================
import streamlit as st
import boto3
from botocore.exceptions import ClientError
# ============================================================
# STEP 1. Streamlit 페이지 설정
# ============================================================
st.set_page_config(
page_title="Chatbot powered by Bedrock",
page_icon="🤖",
layout="centered"
)
# ============================================================
# STEP 2. AWS Bedrock 설정
# ============================================================
AWS_REGION = "us-east-1"
MODEL_ID = "global.anthropic.claude-sonnet-4-6"
# ============================================================
# STEP 3. Bedrock Runtime Client
# ============================================================
bedrock = boto3.client(
service_name="bedrock-runtime",
region_name=AWS_REGION
)
# ============================================================
# STEP 4. Session State 초기화
#
# 가장 최근 질문/답변만 저장합니다.
# ============================================================
if "latest_question" not in st.session_state:
st.session_state.latest_question = ""
if "latest_answer" not in st.session_state:
st.session_state.latest_answer = ""
# ============================================================
# STEP 5. CSS 디자인
# ============================================================
st.markdown(
"""
<style>
/* =====================================================
전체 콘텐츠 영역
===================================================== */
.block-container {
max-width: 1100px !important;
margin-left: auto !important;
margin-right: auto !important;
padding-top: 45px !important;
padding-bottom: 50px !important;
}
/* =====================================================
★ 메인 제목
Chatbot powered by Bedrock
text-align: center
→ 화면 가운데 정렬
font-size: 84px
→ 기존보다 더 크게 표시
===================================================== */
.main-title {
width: 100%;
text-align: center;
font-size: 84px;
font-weight: 900;
line-height: 1.15;
letter-spacing: -3px;
color: #272b3a;
margin-top: 10px;
margin-bottom: 70px;
}
/* =====================================================
질문 입력 제목
===================================================== */
div[data-testid="stTextInput"] label p {
font-size: 32px !important;
font-weight: 800 !important;
color: #272b3a !important;
margin-bottom: 12px !important;
}
/* =====================================================
질문 입력창
===================================================== */
div[data-testid="stTextInput"] input {
background-color: #f4f6fa !important;
color: #272b3a !important;
font-size: 26px !important;
height: 72px !important;
border: 2px solid #e1e5ed !important;
border-radius: 14px !important;
padding-left: 22px !important;
}
/* =====================================================
입력창 클릭 효과
===================================================== */
div[data-testid="stTextInput"] input:focus {
border: 2px solid #4f7cff !important;
box-shadow:
0 0 0 3px rgba(79,124,255,0.15) !important;
}
/* =====================================================
입력창 Placeholder
===================================================== */
div[data-testid="stTextInput"] input::placeholder {
color: #9ca3af !important;
font-size: 23px !important;
}
/* =====================================================
질문하기 버튼
===================================================== */
div[data-testid="stButton"] button {
background-color: #4f7cff !important;
color: white !important;
height: 78px !important;
border-radius: 14px !important;
border: none !important;
margin-top: 10px !important;
}
/* =====================================================
질문하기 버튼 글씨
===================================================== */
div[data-testid="stButton"] button p {
color: white !important;
font-size: 30px !important;
font-weight: 800 !important;
}
/* =====================================================
버튼 Hover
===================================================== */
div[data-testid="stButton"] button:hover {
background-color: #3f69e8 !important;
color: white !important;
border: none !important;
}
/* =====================================================
질문 / 답변 Container
===================================================== */
div[data-testid="stVerticalBlockBorderWrapper"] {
border-radius: 16px !important;
border: 2px solid #e4e7ec !important;
padding: 10px !important;
}
/* =====================================================
일반 답변 글씨
===================================================== */
div[data-testid="stMarkdownContainer"] p {
font-size: 26px;
line-height: 1.8;
}
/* =====================================================
답변 목록
===================================================== */
div[data-testid="stMarkdownContainer"] li {
font-size: 25px;
line-height: 1.8;
margin-bottom: 7px;
}
/* =====================================================
메인 제목에는 영향을 주지 않습니다.
===================================================== */
div[data-testid="stMarkdownContainer"] h1 {
font-size: 40px !important;
margin-top: 20px !important;
margin-bottom: 20px !important;
}
/* =====================================================
답변
===================================================== */
div[data-testid="stMarkdownContainer"] h2 {
font-size: 35px !important;
margin-top: 25px !important;
margin-bottom: 15px !important;
}
/* =====================================================
답변
===================================================== */
div[data-testid="stMarkdownContainer"] h3 {
font-size: 31px !important;
margin-top: 22px !important;
margin-bottom: 12px !important;
}
/* =====================================================
구분선
===================================================== */
hr {
margin-top: 25px !important;
margin-bottom: 25px !important;
}
/* =====================================================
오류 메시지
===================================================== */
div[data-testid="stAlert"] {
border-radius: 14px !important;
}
/* =====================================================
Streamlit 메뉴 숨기기
===================================================== */
#MainMenu {
visibility: hidden;
}
footer {
visibility: hidden;
}
/* =====================================================
작은 화면 대응
===================================================== */
@media (max-width: 768px) {
.main-title {
font-size: 50px;
letter-spacing: -1px;
margin-bottom: 45px;
}
div[data-testid="stTextInput"] label p {
font-size: 25px !important;
}
div[data-testid="stTextInput"] input {
font-size: 22px !important;
height: 64px !important;
}
div[data-testid="stButton"] button p {
font-size: 25px !important;
}
}
</style>
""",
unsafe_allow_html=True
)
# ============================================================
# STEP 6. 메인 제목
#
# st.title() 대신 별도의 HTML 제목을 사용합니다.
#
# 이렇게 하면 화면 중앙 정렬과
# 글자 크기를 정확하게 조절할 수 있습니다.
# ============================================================
st.markdown(
"""
<div class="main-title">
Chatbot powered by Bedrock
</div>
""",
unsafe_allow_html=True
)
# ============================================================
# STEP 7. 질문 입력
# ============================================================
question = st.text_input(
"질문을 입력하세요.",
placeholder="예: LLM이 뭐야?",
key="question_input"
)
# ============================================================
# STEP 8. 질문하기 버튼
# ============================================================
ask_button = st.button(
"질문하기",
use_container_width=True
)
# ============================================================
# STEP 9. 질문하기 버튼 클릭
# ============================================================
if ask_button:
# 입력값 앞뒤 공백 제거
question = question.strip()
# ========================================================
# 질문을 입력하지 않은 경우
# ========================================================
if not question:
st.warning(
"질문을 입력한 후 질문하기 버튼을 눌러주세요."
)
# ========================================================
# 질문을 입력한 경우
# ========================================================
else:
try:
# =================================================
# Bedrock 응답 생성
# =================================================
with st.spinner(
"Amazon Bedrock이 답변을 생성하고 있습니다..."
):
response = bedrock.converse(
modelId=MODEL_ID,
messages=[
{
"role": "user",
"content": [
{
"text": question
}
]
}
],
inferenceConfig={
"maxTokens": 2000,
"temperature": 0.0
}
)
# =================================================
# STEP 10. AI 답변 추출
# =================================================
answer = (
response["output"]
["message"]
["content"][0]
["text"]
)
# =================================================
# STEP 11. 최신 질문 저장
#
# 이전 질문은 새로운 질문으로 교체됩니다.
# =================================================
st.session_state.latest_question = question
# =================================================
# STEP 12. 최신 답변 저장
#
# 이전 답변도 새로운 답변으로 교체됩니다.
# =================================================
st.session_state.latest_answer = answer
# =====================================================
# AWS Bedrock 오류
# =====================================================
except ClientError as error:
error_code = (
error.response["Error"]["Code"]
)
error_message = (
error.response["Error"]["Message"]
)
st.error(
f"AWS Bedrock 오류\n\n"
f"Error Code: {error_code}\n\n"
f"{error_message}"
)
# =====================================================
# 일반 Python 오류
# =====================================================
except Exception as error:
st.error(
f"Python 오류가 발생했습니다.\n\n{error}"
)
# ============================================================
# STEP 13. 최신 사용자 질문 표시
# ============================================================
if st.session_state.latest_question:
st.write("")
st.write("")
with st.container(border=True):
st.markdown(
"### 🔵 사용자 질문"
)
st.markdown(
f"## {st.session_state.latest_question}"
)
# ============================================================
# STEP 14. 최신 Bedrock 답변 표시
# ============================================================
if st.session_state.latest_answer:
st.write("")
with st.container(border=True):
st.markdown(
"### 🟠 Amazon Bedrock 답변"
)
st.divider()
st.markdown(
st.session_state.latest_answer
)
JavaScript
복사
•
11.lambda_func.py 생성
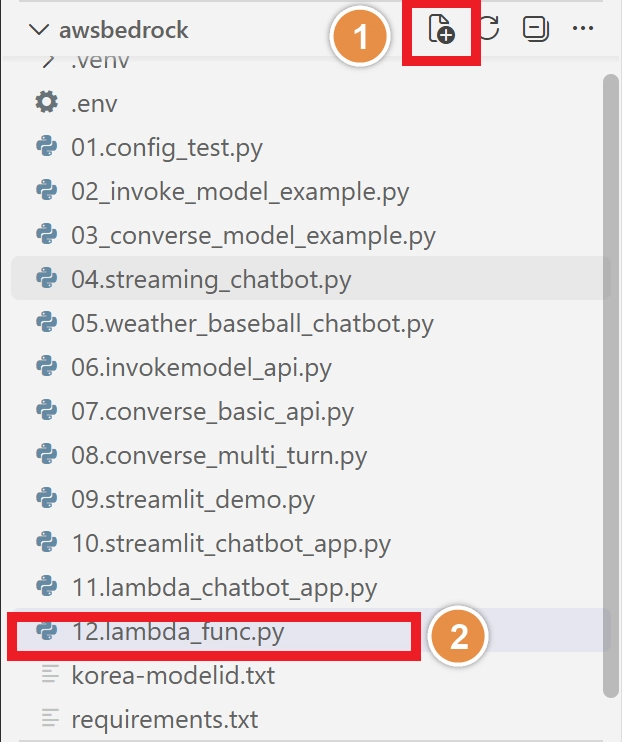
12.lambda_func.py
JavaScript
복사
# ============================================================
# AWS Lambda + Amazon Bedrock Converse API
# Amazon Nova Micro를 이용한 텍스트 생성 예제
# ============================================================
# ------------------------------------------------------------
# 01. 필요한 라이브러리 import
# ------------------------------------------------------------
# JSON 데이터를 처리하기 위한 Python 기본 라이브러리
import json
# AWS 서비스를 Python에서 호출하기 위한 AWS SDK
import boto3
# AWS API 호출 오류를 처리하기 위한 예외 클래스
from botocore.exceptions import ClientError
# ------------------------------------------------------------
# 02. AWS Bedrock Runtime Client 생성
# ------------------------------------------------------------
# Amazon Bedrock Runtime 서비스를 호출하기 위한 Client 생성
#
# region_name:
# Bedrock 모델을 사용하는 AWS 리전
# 현재 예제에서는 미국 동부 버지니아 북부(us-east-1)를 사용
#
# Lambda가 us-east-1이 아니더라도
# Bedrock 호출은 지정한 us-east-1로 연결할 수 있습니다.
# ------------------------------------------------------------
bedrock_runtime = boto3.client(
"bedrock-runtime",
region_name="us-east-1"
)
# ------------------------------------------------------------
# 03. 사용할 Amazon Bedrock 모델 지정
# ------------------------------------------------------------
# Amazon Nova Micro 모델 ID
#
# Nova Micro는 텍스트 생성에 빠르고 효율적인 모델입니다.
# 만약 해당 모델에 대한 접근 권한이 없다면
# Bedrock 콘솔에서 모델 액세스를 요청해야 합니다.
# ------------------------------------------------------------
MODEL_ID = "amazon.nova-micro-v1:0"
# ------------------------------------------------------------
# 04. HTTP 응답을 만들어주는 함수
# ------------------------------------------------------------
def generate_response(status_code, body):
"""
API Gateway로 반환할 HTTP 응답을 생성하는 함수
status_code:
HTTP 상태 코드
예:
200 = 성공
400 = 잘못된 요청
500 = 서버 오류
body:
사용자에게 반환할 데이터
"""
return {
# HTTP 상태 코드
"statusCode": status_code,
# 응답 Header
"headers": {
# JSON 형태로 데이터를 반환한다는 의미
"Content-Type": "application/json; charset=utf-8",
# CORS 허용
# 모든 웹사이트에서 이 API를 호출할 수 있도록 허용
"Access-Control-Allow-Origin": "*",
# 허용할 HTTP Method
"Access-Control-Allow-Methods": "GET,POST,OPTIONS",
# 허용할 Header
"Access-Control-Allow-Headers": "Content-Type",
},
# API Gateway는 body를 문자열 형태로 전달받으므로
# json.dumps()를 사용해서 JSON 문자열로 변환
"body": json.dumps(
body,
ensure_ascii=False
)
}
# ------------------------------------------------------------
# 05. Lambda 실행 Handler 함수
# ------------------------------------------------------------
def lambda_handler(event, context):
"""
AWS Lambda가 실행될 때 가장 먼저 호출되는 함수
event:
API Gateway 등에서 Lambda로 전달된 요청 데이터
context:
Lambda 실행 환경 정보
"""
# --------------------------------------------------------
# 05-1. Lambda에 전달된 event 확인
# --------------------------------------------------------
print("==========================================")
print("Lambda 함수가 실행되었습니다.")
print("==========================================")
print(f"Received event: {json.dumps(event, ensure_ascii=False)}")
# --------------------------------------------------------
# 05-2. 현재 boto3 버전 확인
# --------------------------------------------------------
print(f"boto3 version: {boto3.__version__}")
# --------------------------------------------------------
# 05-3. HTTP Method 확인
# --------------------------------------------------------
# API Gateway HTTP API의 경우
# event["requestContext"]["http"]["method"]
# 형태로 HTTP Method를 확인할 수 있습니다.
#
# 테스트 이벤트나 직접 호출 시 해당 값이 없을 수 있으므로
# get()을 사용하여 안전하게 처리
# --------------------------------------------------------
request_context = event.get("requestContext", {})
http_info = request_context.get("http", {})
http_method = http_info.get("method", "")
print(f"HTTP Method: {http_method}")
# --------------------------------------------------------
# 05-4. OPTIONS 요청 처리 (CORS Preflight)
# --------------------------------------------------------
# 웹 브라우저에서 CORS를 사용할 때
# OPTIONS 요청이 먼저 들어올 수 있습니다.
# --------------------------------------------------------
if http_method == "OPTIONS":
return generate_response(
200,
{
"message": "CORS preflight request"
}
)
# --------------------------------------------------------
# 05-5. GET 요청 처리
# --------------------------------------------------------
# 이 API는 POST 요청이 기본이므로
# 사용자가 웹브라우저 등 GET으로 접근하면 안내 메시지 반환
# --------------------------------------------------------
if http_method == "GET":
return generate_response(
200,
{
"message": "GET 요청을 처리했습니다.",
"info": "이 API는 POST 요청으로 prompt를 전달받습니다."
}
)
# --------------------------------------------------------
# 05-6. POST 이외의 요청 거절
# --------------------------------------------------------
if http_method and http_method != "POST":
return generate_response(
405,
{
"error": "POST 요청만 사용할 수 있습니다."
}
)
# --------------------------------------------------------
# 05-7. try 시작
# --------------------------------------------------------
try:
# ----------------------------------------------------
# 06. API Gateway의 body 가져오기
# ----------------------------------------------------
# API Gateway에서 전달되는 body는 비어있을 수 있으므로
# 기본값 "{}" 설정
# ----------------------------------------------------
raw_body = event.get("body", "{}")
print(f"Raw body: {raw_body}")
# ----------------------------------------------------
# 07. body가 Base64로 인코딩되어 있는 경우 처리
# ----------------------------------------------------
# 일반적인 API Gateway 요청에서는 False
# 만약 Base64로 전달되면 에러 처리
# ----------------------------------------------------
if event.get("isBase64Encoded", False):
return generate_response(
400,
{
"error": "Base64 encoded body는 현재 지원하지 않습니다."
}
)
# ----------------------------------------------------
# 08. JSON 문자열을 Python Dictionary로 변환
# ----------------------------------------------------
try:
request_body = json.loads(raw_body)
except json.JSONDecodeError:
return generate_response(
400,
{
"error": "요청 body가 올바른 JSON 형식이 아닙니다."
}
)
# ----------------------------------------------------
# 09. prompt 추출
# ----------------------------------------------------
# 사용자가 다음과 같이 요청했다고 가정:
# {
# "prompt": "Amazon Bedrock이란 무엇인가요?"
# }
# ----------------------------------------------------
prompt = request_body.get("prompt")
# ----------------------------------------------------
# 10. prompt 누락 예외 처리
# ----------------------------------------------------
if not prompt:
return generate_response(
400,
{
"error": "prompt 값이 필요합니다.",
"example": {
"prompt": "Amazon Bedrock이란 무엇인가요?"
}
}
)
# ----------------------------------------------------
# 11. prompt의 데이터 타입 검사
# ----------------------------------------------------
if not isinstance(prompt, str):
return generate_response(
400,
{
"error": "prompt는 문자열이어야 합니다."
}
)
# ----------------------------------------------------
# 12. 불필요한 공백 제거
# ----------------------------------------------------
prompt = prompt.strip()
# ----------------------------------------------------
# 13. 공백 문자열 검사
# ----------------------------------------------------
if not prompt:
return generate_response(
400,
{
"error": "prompt가 비어 있습니다."
}
)
# ----------------------------------------------------
# 14. 처리할 prompt CloudWatch Logs에 출력
# ----------------------------------------------------
print(f"Processing prompt: {prompt}")
# ----------------------------------------------------
# 15. Converse API에 전달할 메시지 구조 작성
# ----------------------------------------------------
# Converse API 규격:
# role: user / assistant
# content: [{'text': '...'}]
# ----------------------------------------------------
messages = [
{
"role": "user",
"content": [
{
"text": prompt
}
]
}
]
# ----------------------------------------------------
# 16. 추론 옵션(Inference Config) 설정
# ----------------------------------------------------
inference_config = {
# 최대 생성 토큰 수
"maxTokens": 512,
# 창의성 수치 (낮을수록 정밀하고 일관된 답변)
"temperature": 0.2,
# 상위 확률 샘플링 비율
"topP": 0.9
}
# ----------------------------------------------------
# 17. Amazon Bedrock Converse API 호출
# ----------------------------------------------------
print(f"Calling Bedrock model: {MODEL_ID}")
response = bedrock_runtime.converse(
# 사용할 모델 ID
modelId=MODEL_ID,
# 전달할 메시지
messages=messages,
# 추론 설정
inferenceConfig=inference_config
)
# ----------------------------------------------------
# 18. Bedrock 응답 수신 확인
# ----------------------------------------------------
print("Bedrock response received.")
# ----------------------------------------------------
# 19. 응답 메시지 추출
# ----------------------------------------------------
output_message = response["output"]["message"]
# ----------------------------------------------------
# 20. 생성된 텍스트 추출
# ----------------------------------------------------
content = output_message.get("content", [])
# ----------------------------------------------------
# 21. text 결합
# ----------------------------------------------------
model_response = ""
for content_item in content:
if "text" in content_item:
model_response += content_item["text"]
# ----------------------------------------------------
# 22. 응답 내용이 비어있는지 확인
# ----------------------------------------------------
if not model_response:
return generate_response(
500,
{
"error": "Bedrock 모델에서 텍스트 응답을 받지 못했습니다."
}
)
# ----------------------------------------------------
# 23. 생성된 응답 CloudWatch Logs 출력
# ----------------------------------------------------
print("==========================================")
print("Model response:")
print(model_response)
print("==========================================")
# ----------------------------------------------------
# 24. 토큰 사용량 정보 추출
# ----------------------------------------------------
usage = response.get("usage", {})
# ----------------------------------------------------
# 25. 종료 이유 추출
# ----------------------------------------------------
stop_reason = response.get(
"stopReason",
"unknown"
)
# ----------------------------------------------------
# 26. 최종 성공 응답 반환
# ----------------------------------------------------
return generate_response(
# HTTP 200 = 성공
200,
{
# 입력된 프롬프트
"prompt": prompt,
# AI 생성 답변
"response": model_response,
# 사용된 모델
"model": MODEL_ID,
# 종료 사유
"stopReason": stop_reason,
# 토큰 사용량
"usage": usage
}
)
# --------------------------------------------------------
# 27. AWS ClientError 예외 처리
# --------------------------------------------------------
except ClientError as e:
error_code = e.response.get(
"Error",
{}
).get(
"Code",
"Unknown"
)
error_message = e.response.get(
"Error",
{}
).get(
"Message",
str(e)
)
# CloudWatch Logs에 에러 출력
print("==========================================")
print("Bedrock ClientError")
print(f"Error Code: {error_code}")
print(f"Error Message: {error_message}")
print("==========================================")
# API 호출자에게 에러 반환
return generate_response(
500,
{
"error": "Bedrock API 호출 중 에러가 발생했습니다.",
"errorCode": error_code,
"message": error_message
}
)
# --------------------------------------------------------
# 28. 예상치 못한 기타 예외 처리
# --------------------------------------------------------
except Exception as e:
# CloudWatch Logs에 에러 출력
print("==========================================")
print("Unexpected Error")
print(str(e))
print("==========================================")
# API 호출자에게 에러 반환
return generate_response(
500,
{
"error": "Lambda 실행 중 예상치 못한 에러가 발생했습니다.",
"message": str(e)
}
)
JavaScript
복사
lambda 함수 생성 (함수이름 : bedrock-api)
bedrock-api
JavaScript
복사
1단계
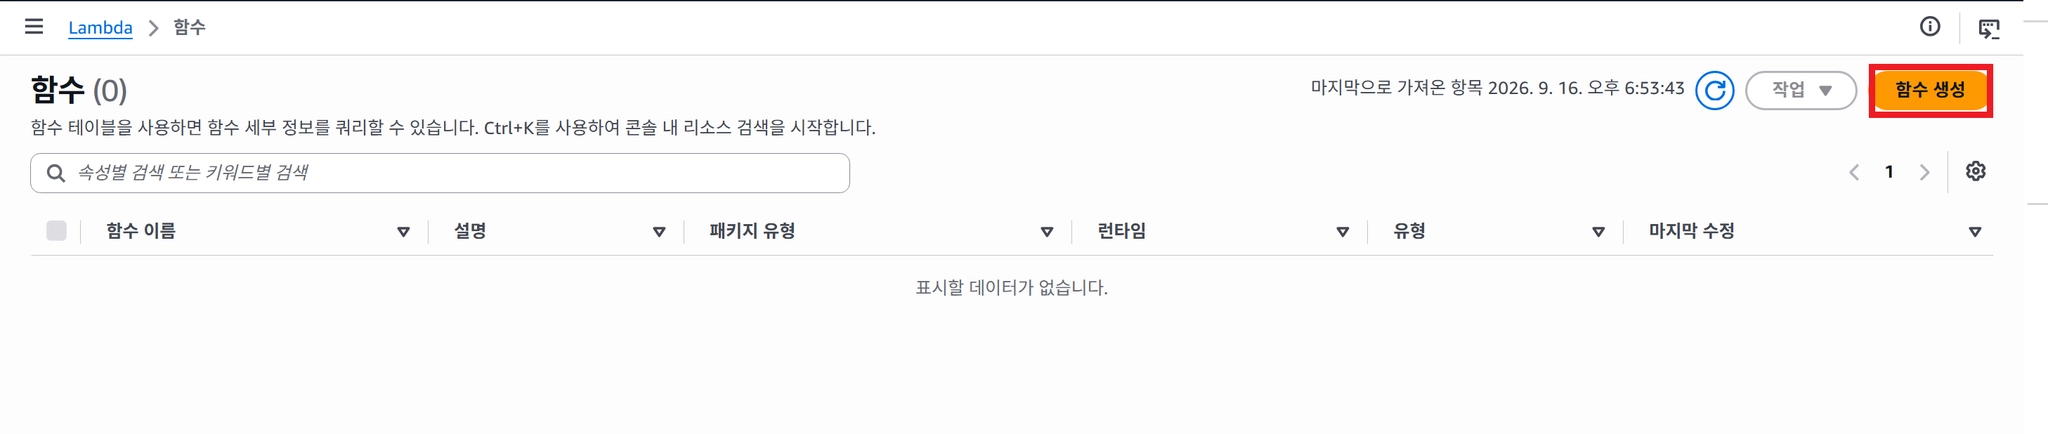
2단계
bedrock-api
JavaScript
복사
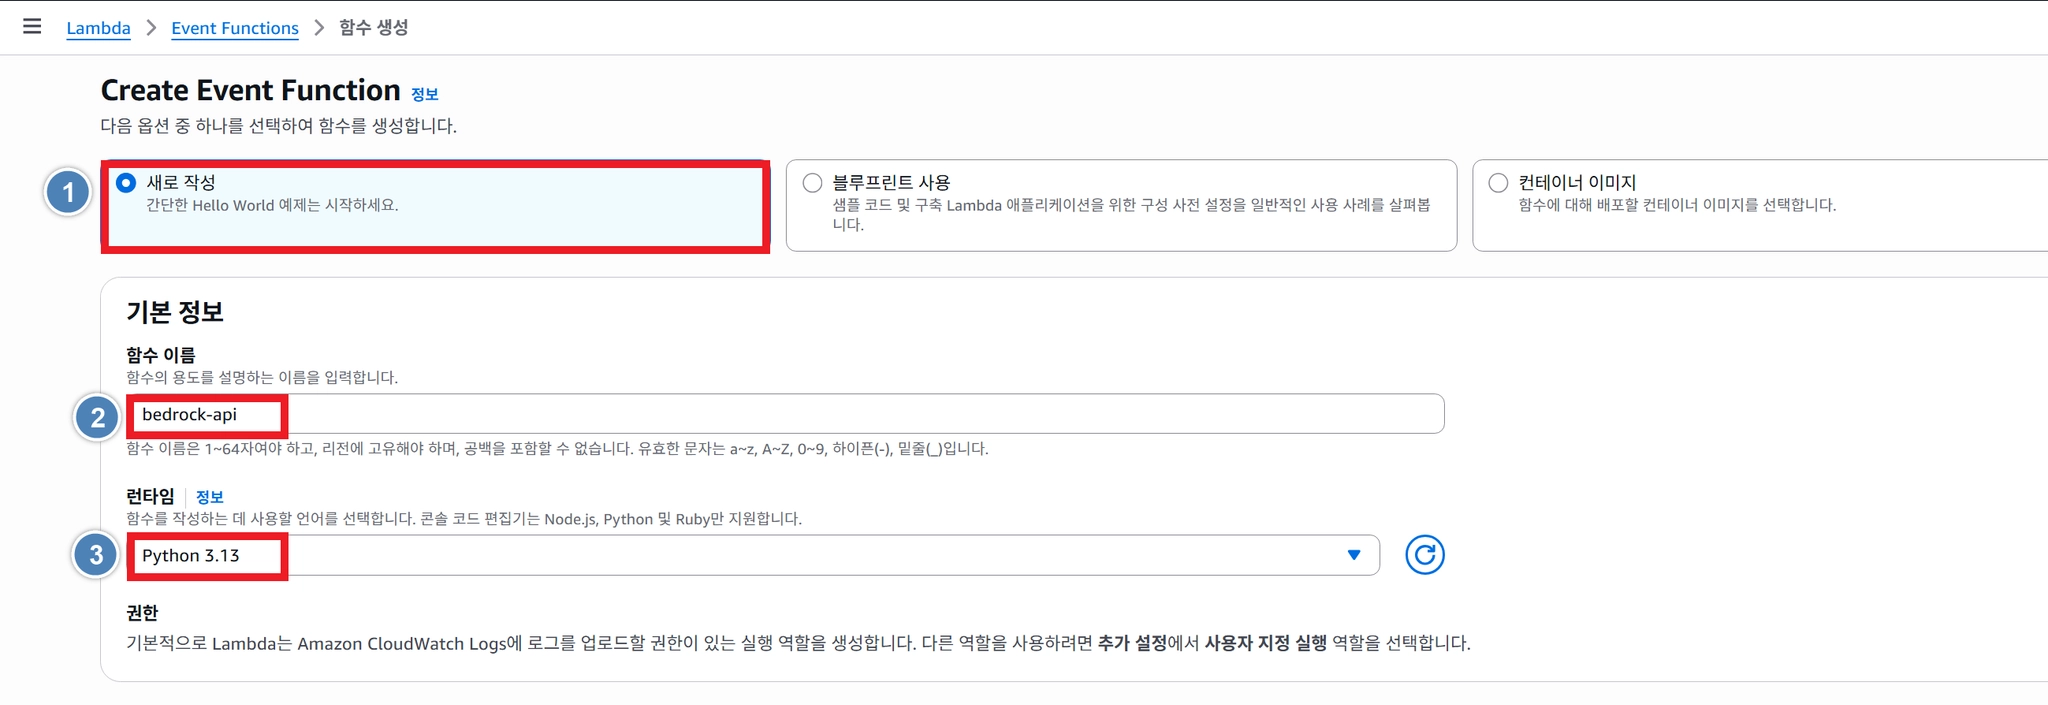
3단계
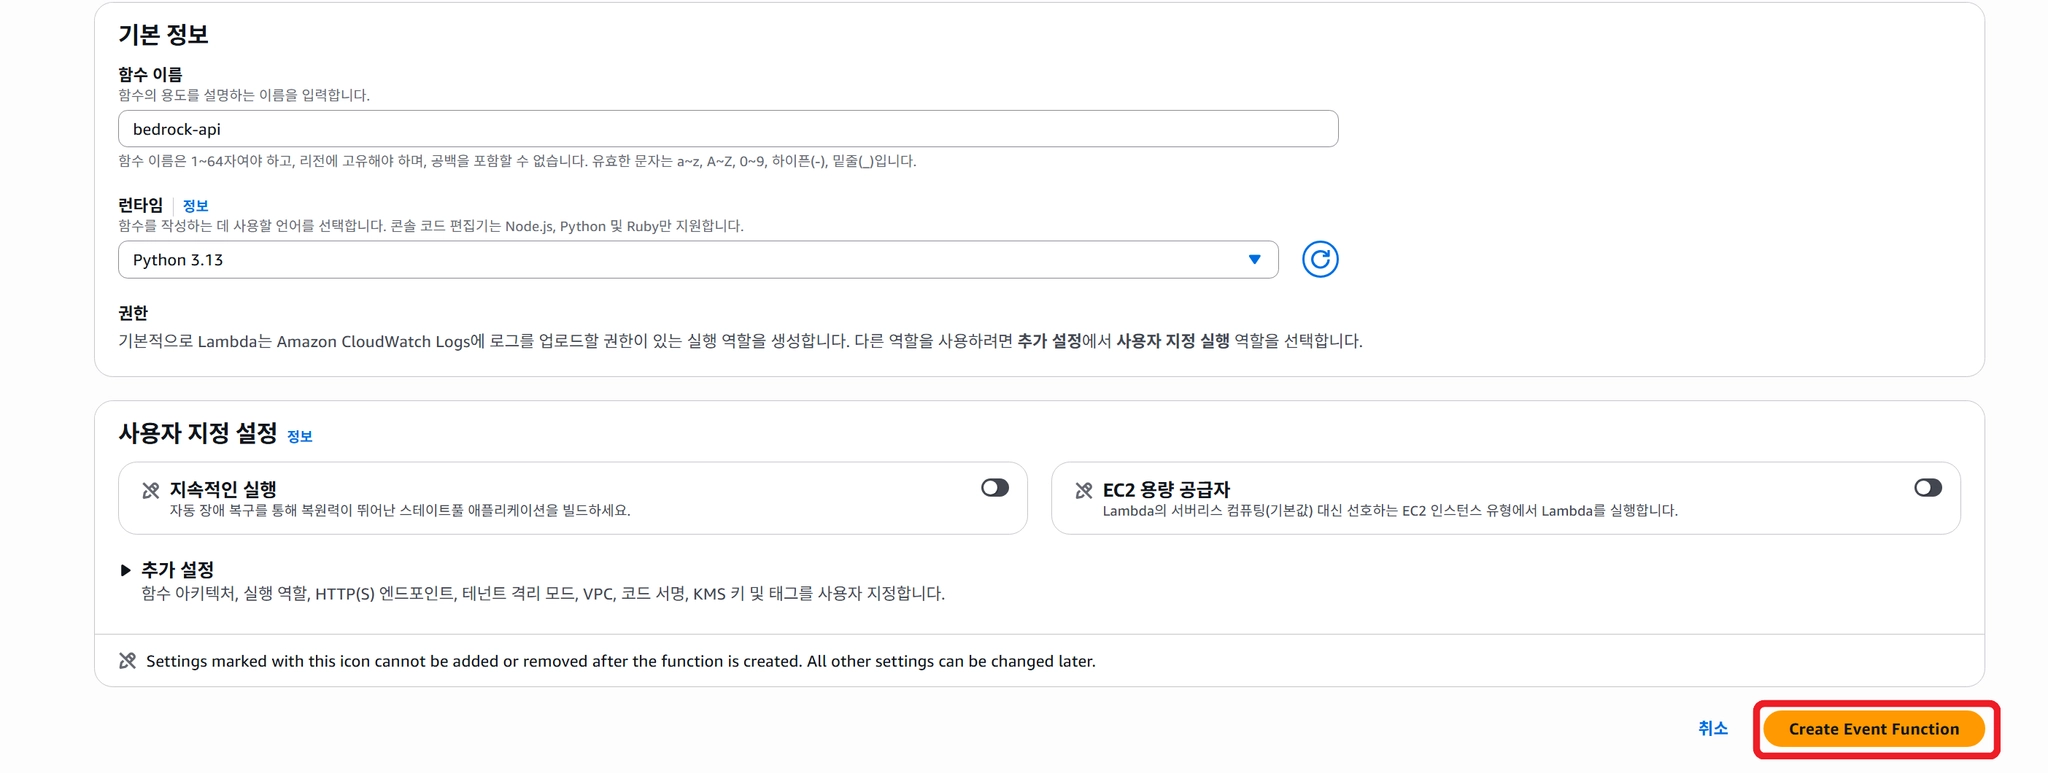
4단계
11.lambda_func.py 코드를 입력한다.
JavaScript
복사
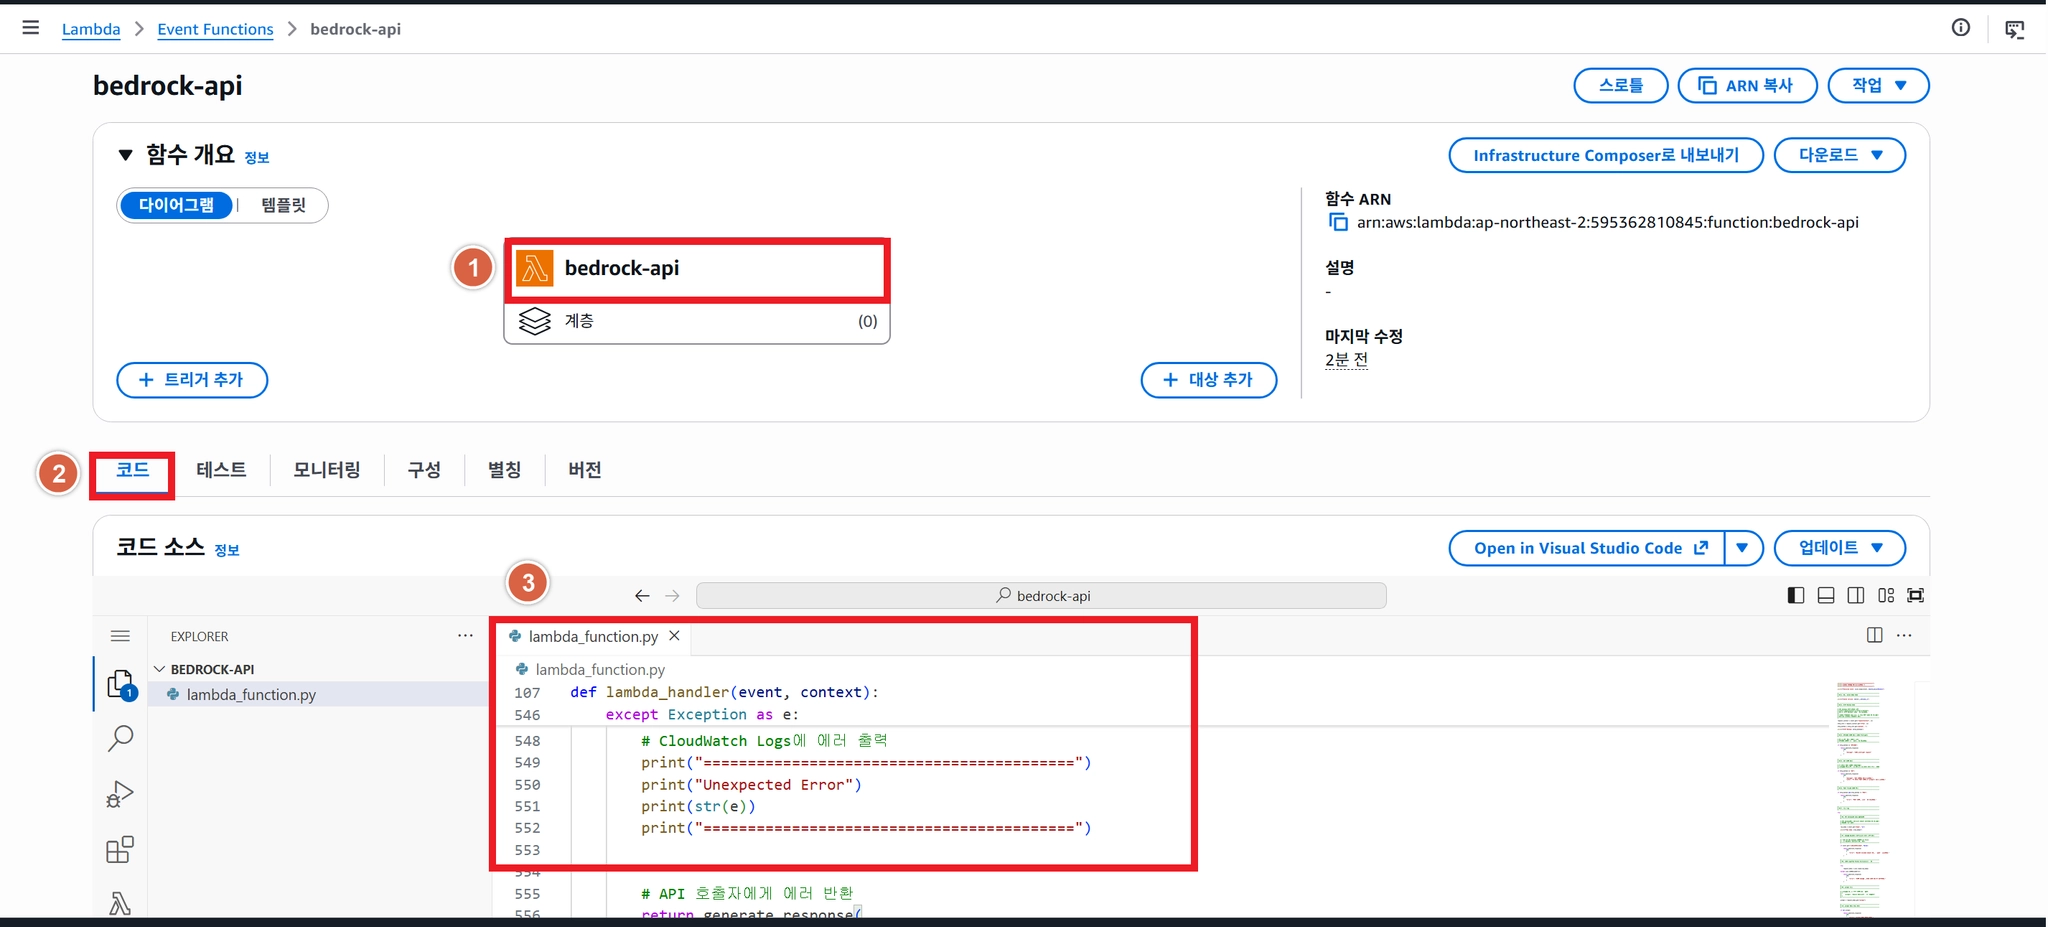
5단계 (배포)
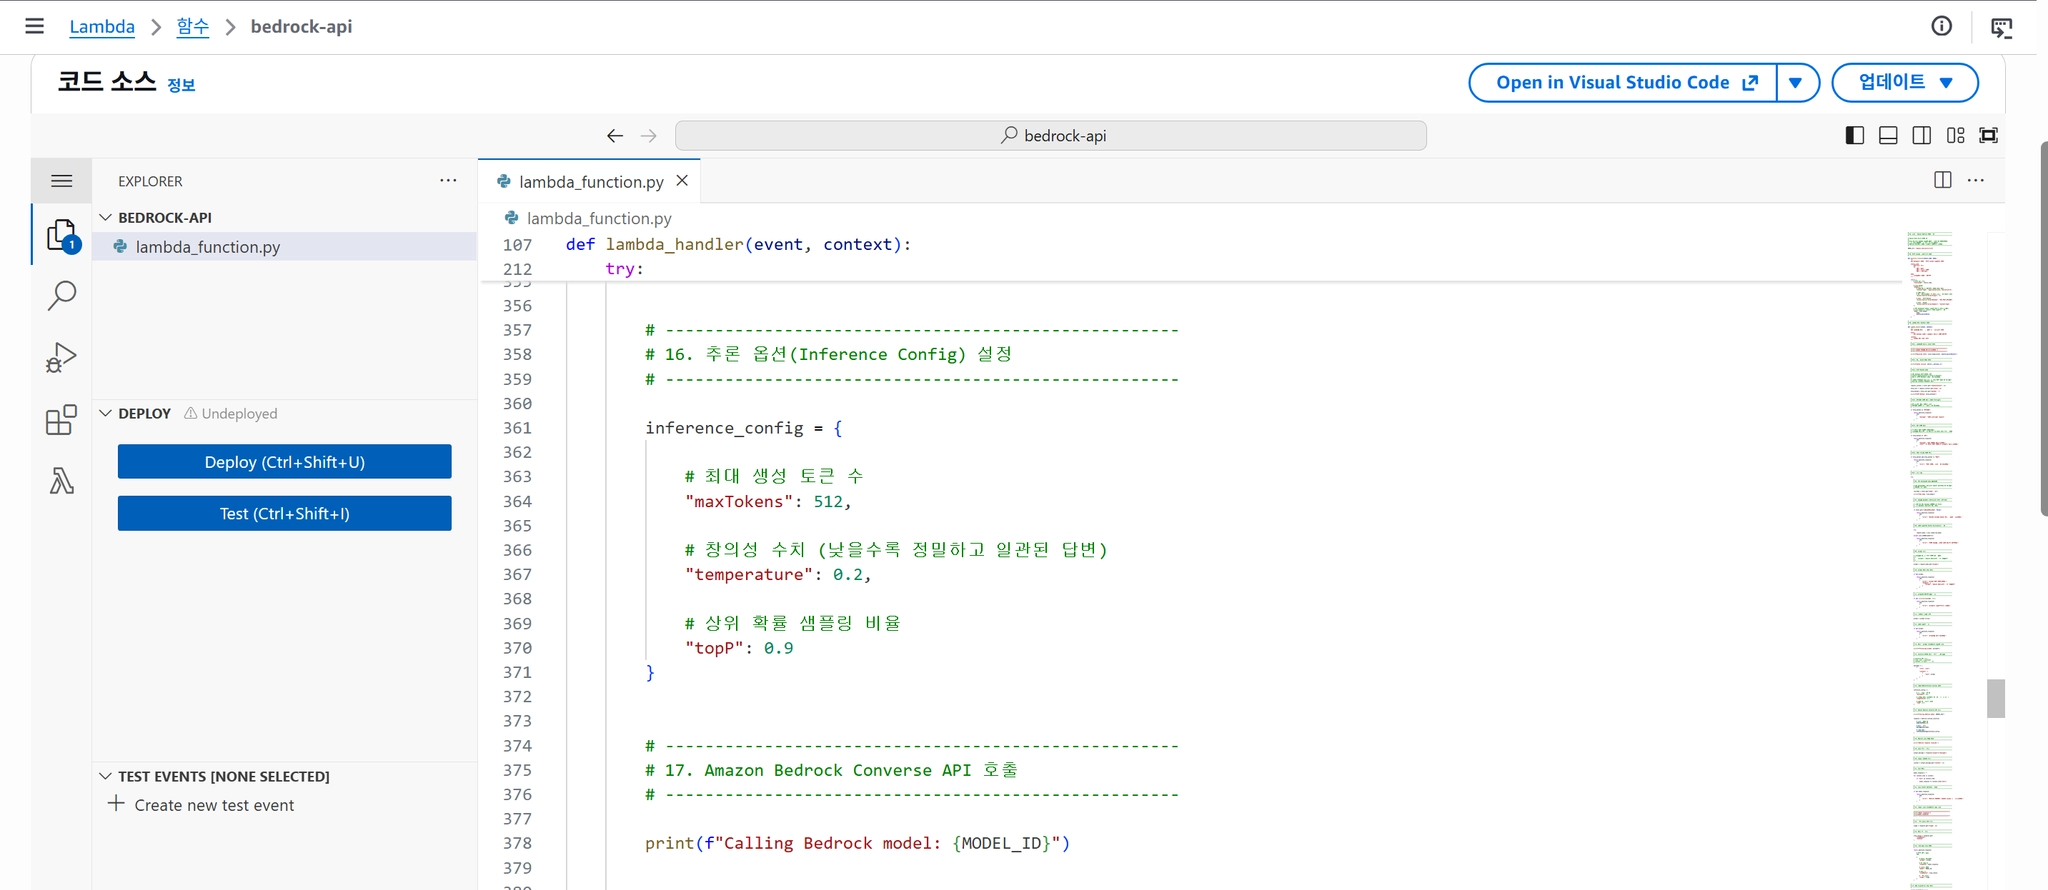
6단계
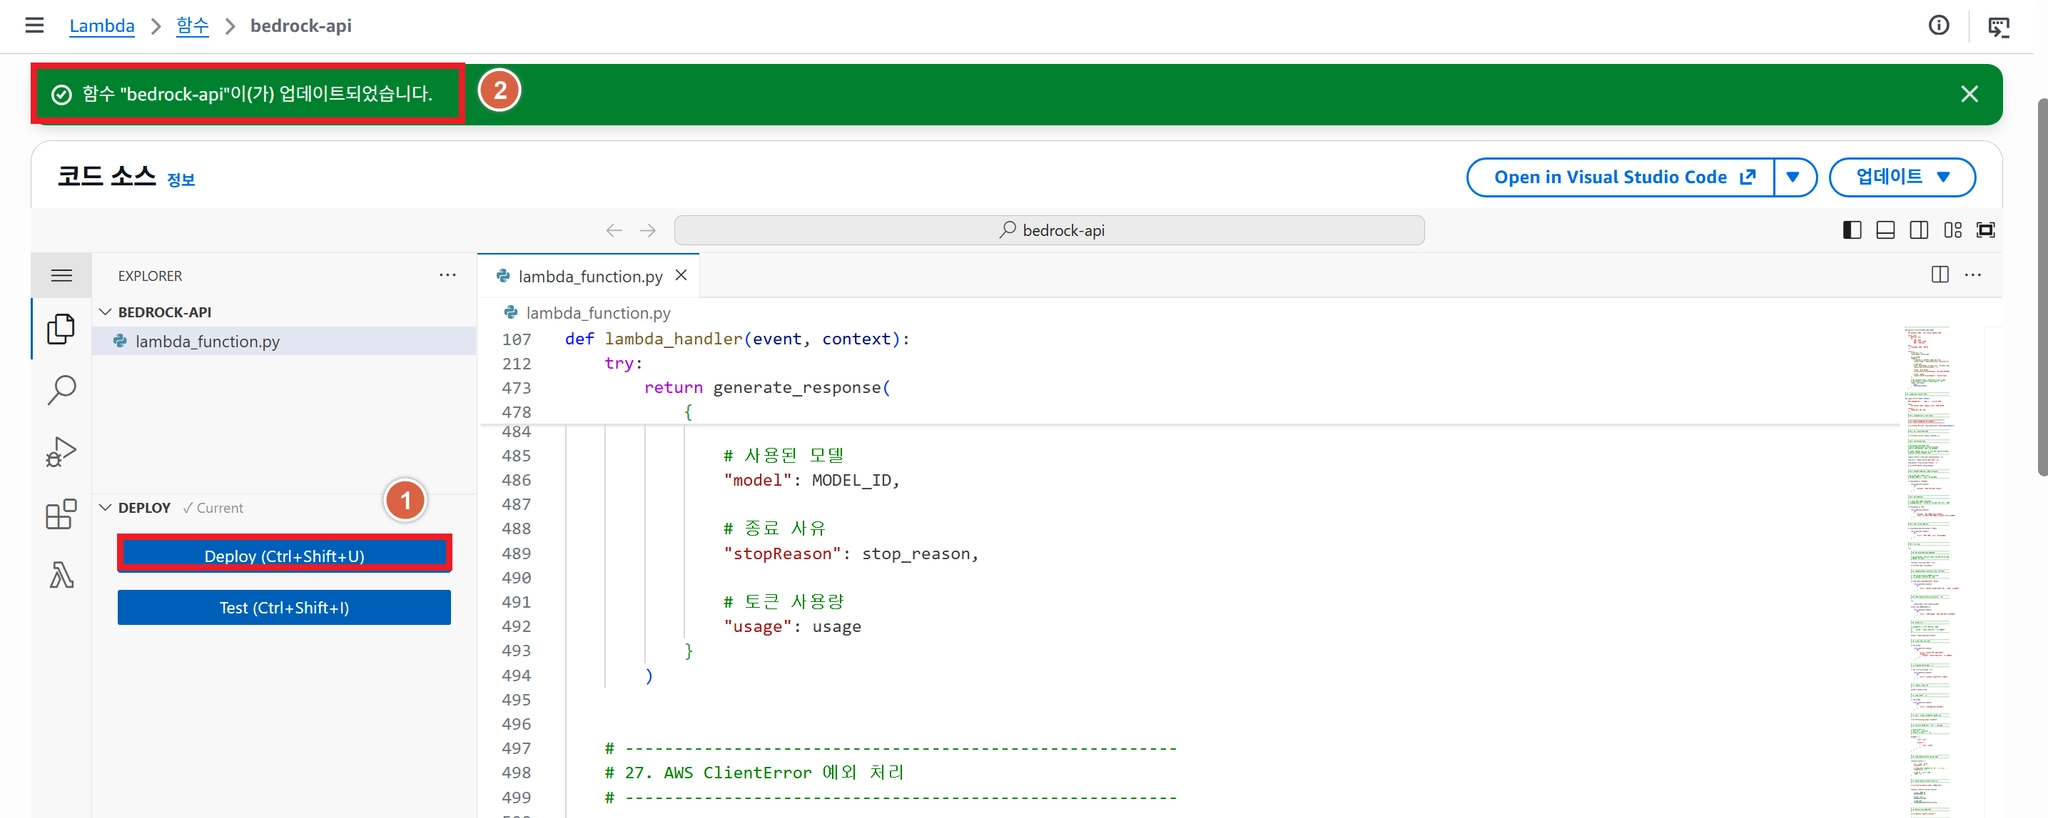
7단계
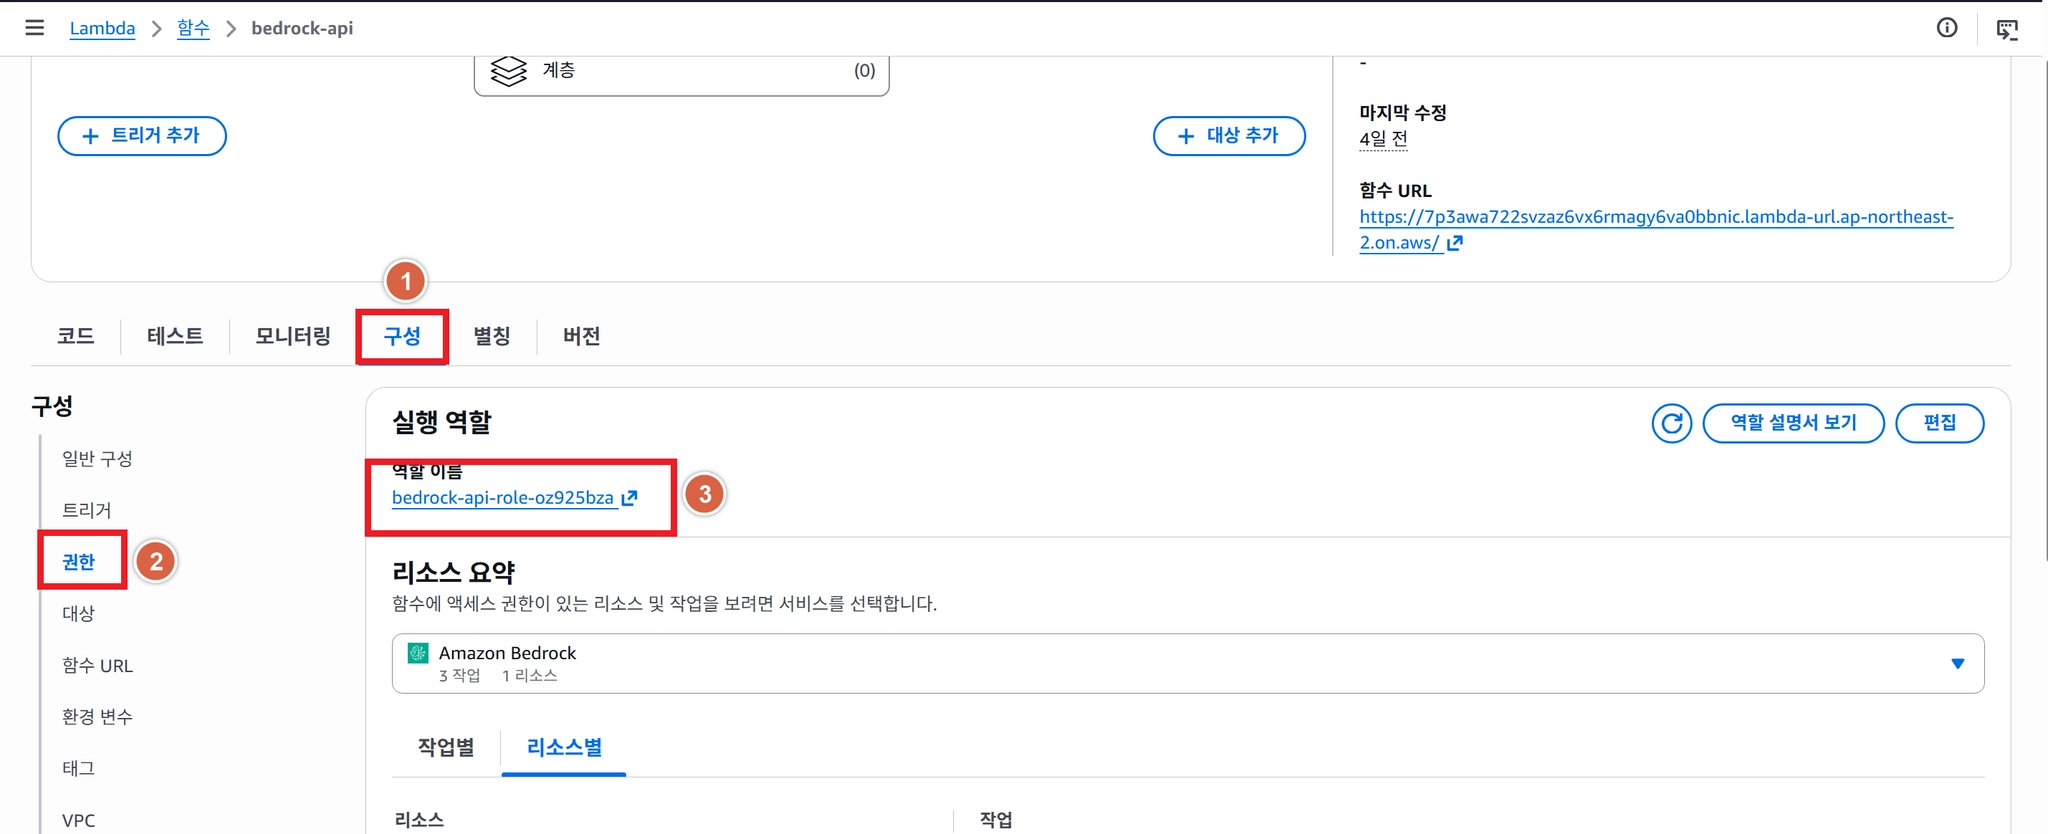
8단계
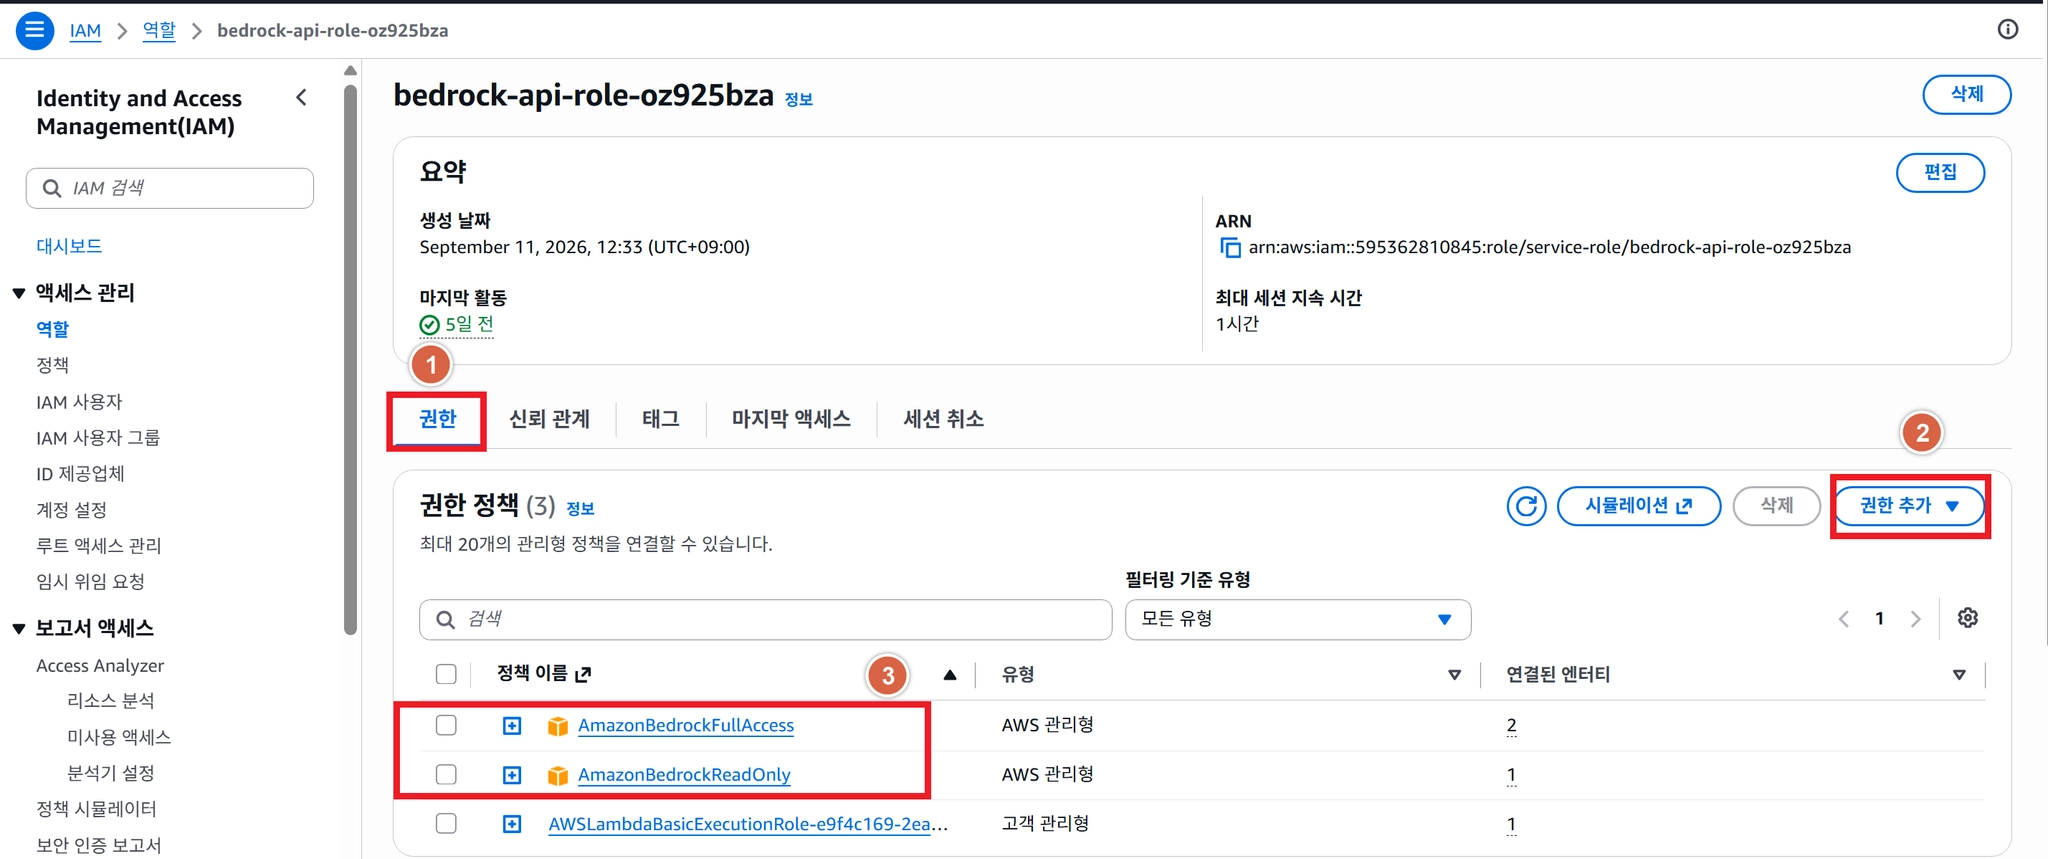
9단계
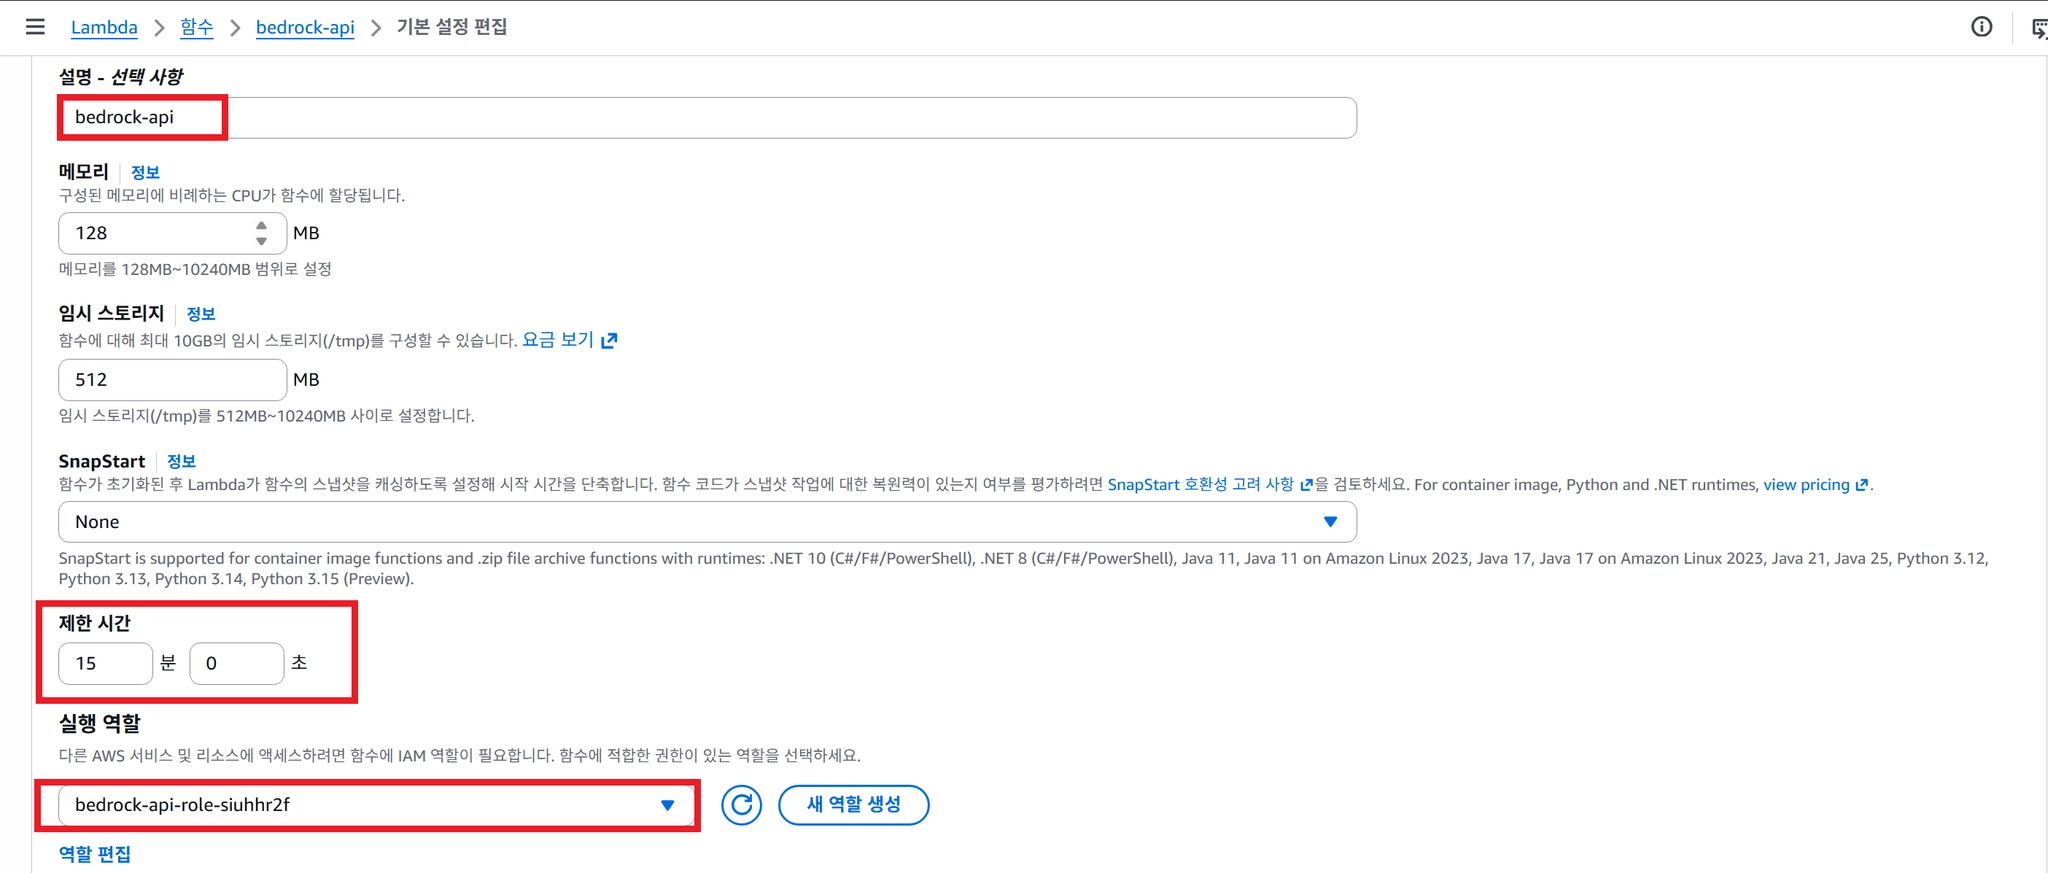
10단계
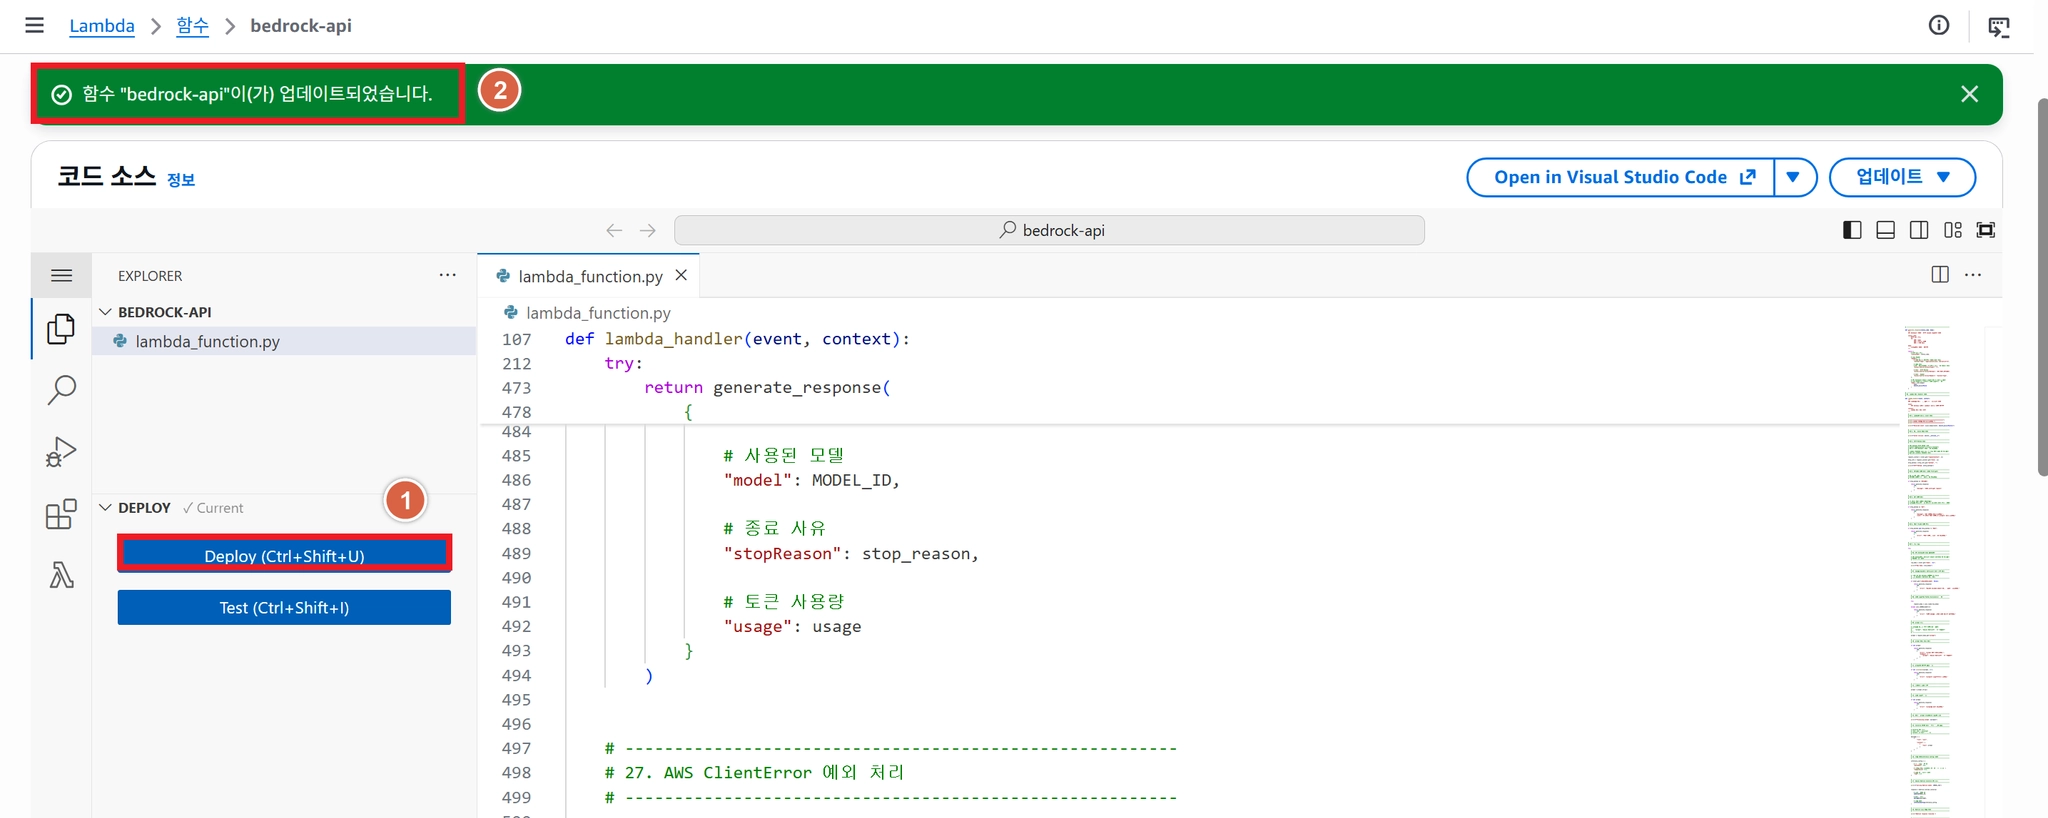
11단계 (람다함수 정상호출 테스트 방법_1번)
이벤트 방식이용 : 이벤트 테스트 진행
이벤트 이름 : BedrockTestSuccess
BedrockTestSuccess
JavaScript
복사
12단계 : 이벤트 JSON
{
"version": "2.0",
"routeKey": "POST /bedrock",
"rawPath": "/bedrock",
"requestContext": {
"http": {
"method": "POST",
"path": "/bedrock"
}
},
"headers": {
"content-type": "application/json"
},
"body": "{\"prompt\":\"Amazon Bedrock이란 무엇인가요? 초보자가 이해하기 쉽게 설명해주세요.\"}",
"isBase64Encoded": false
}
JavaScript
복사
13단계 : 정상확인
{
"statusCode": 200,
"headers": {
"Content-Type": "application/json; charset=utf-8",
"Access-Control-Allow-Origin": "*",
"Access-Control-Allow-Methods": "GET,POST,OPTIONS",
"Access-Control-Allow-Headers": "Content-Type"
},
"body": "{\"prompt\": \"Amazon Bedrock이란 무엇인가요? 초보자가 이해하기 쉽게 설명해주세요.\", \"response\": \"Amazon Bedrock은 AWS에서 제공하는 생성형 AI 서비스입니다. 다양한 AI 모델을 API를 통해 사용할 수 있도록 지원합니다.\", \"model\": \"amazon.nova-micro-v1:0\", \"stopReason\": \"end_turn\", \"usage\": {\"inputTokens\": 20, \"outputTokens\": 70, \"totalTokens\": 90}}"
}
JavaScript
복사
13단계에게 500 error 코드가 테스트 시 발생된다면 Lambda 에서 awsbedrock에 접근할 수 있는 권한이 있는지 확인한다.
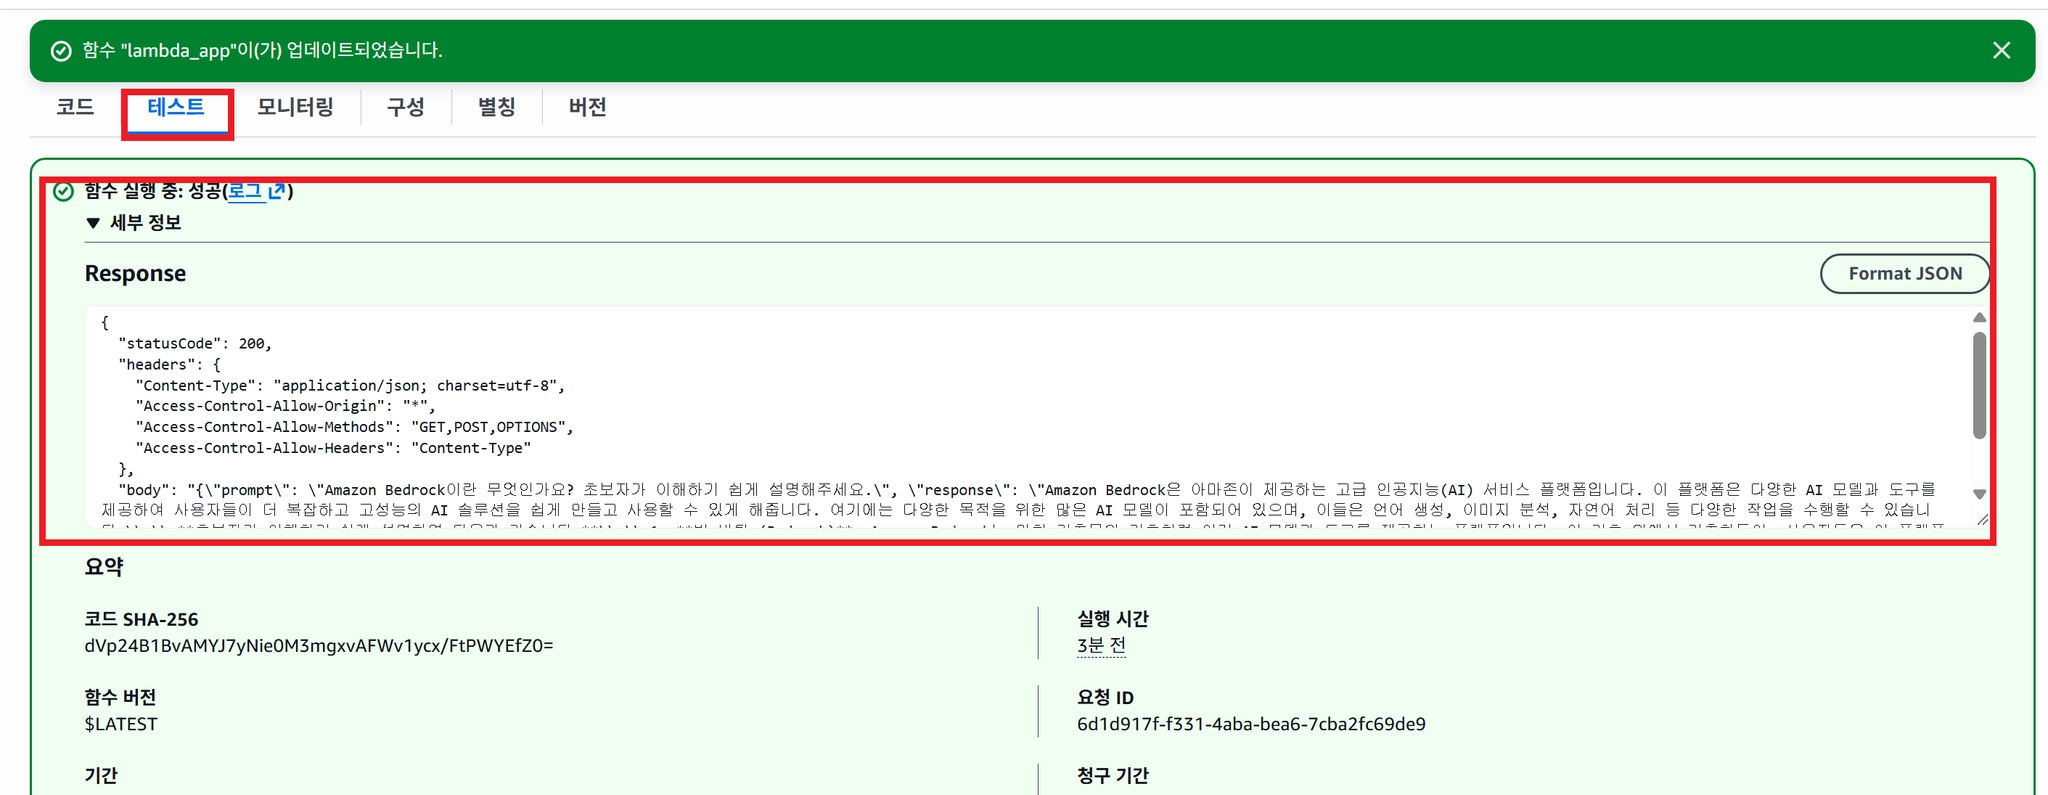
14단계 : (람다함수 정상호출 테스트 방법_2번)
•
postman 방식이용 : 함수 url 정보를 이용한 테스트 방식
1번
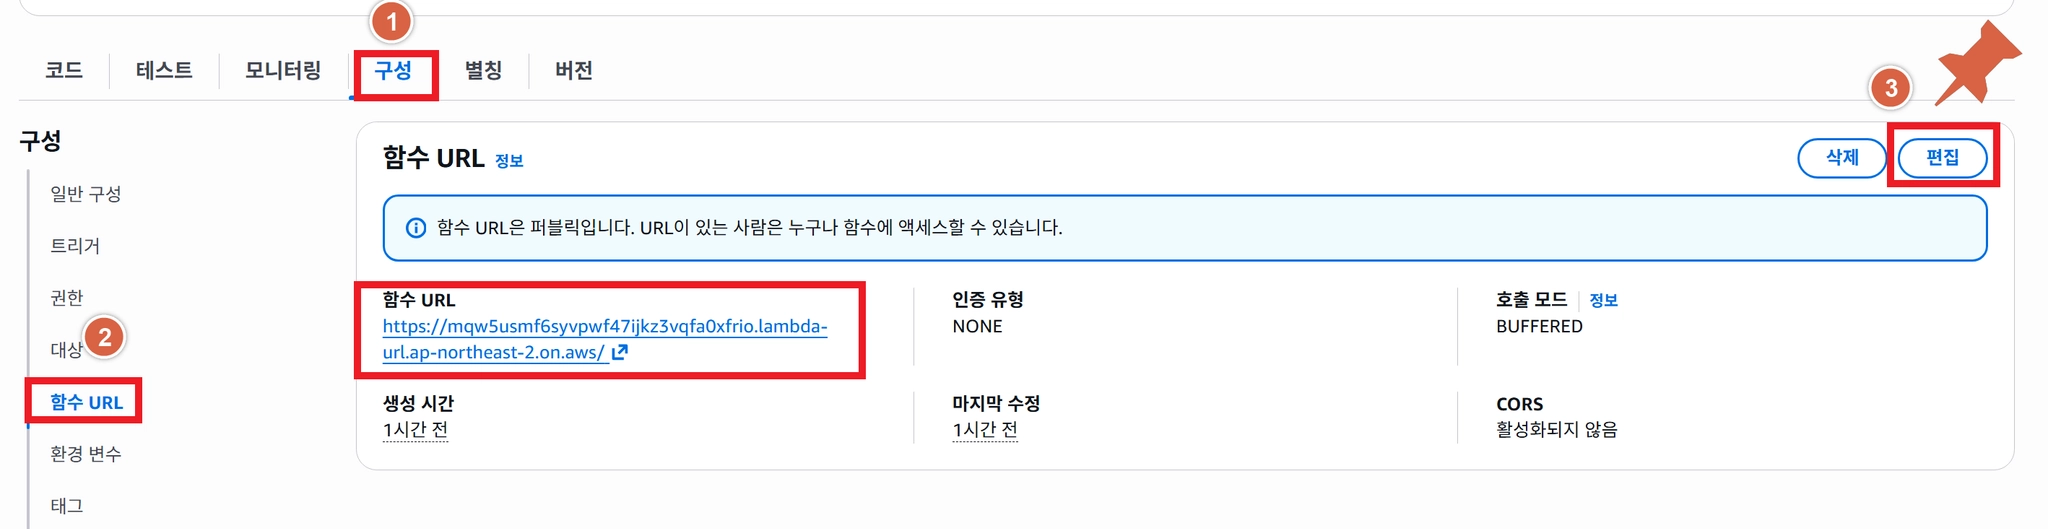
2번
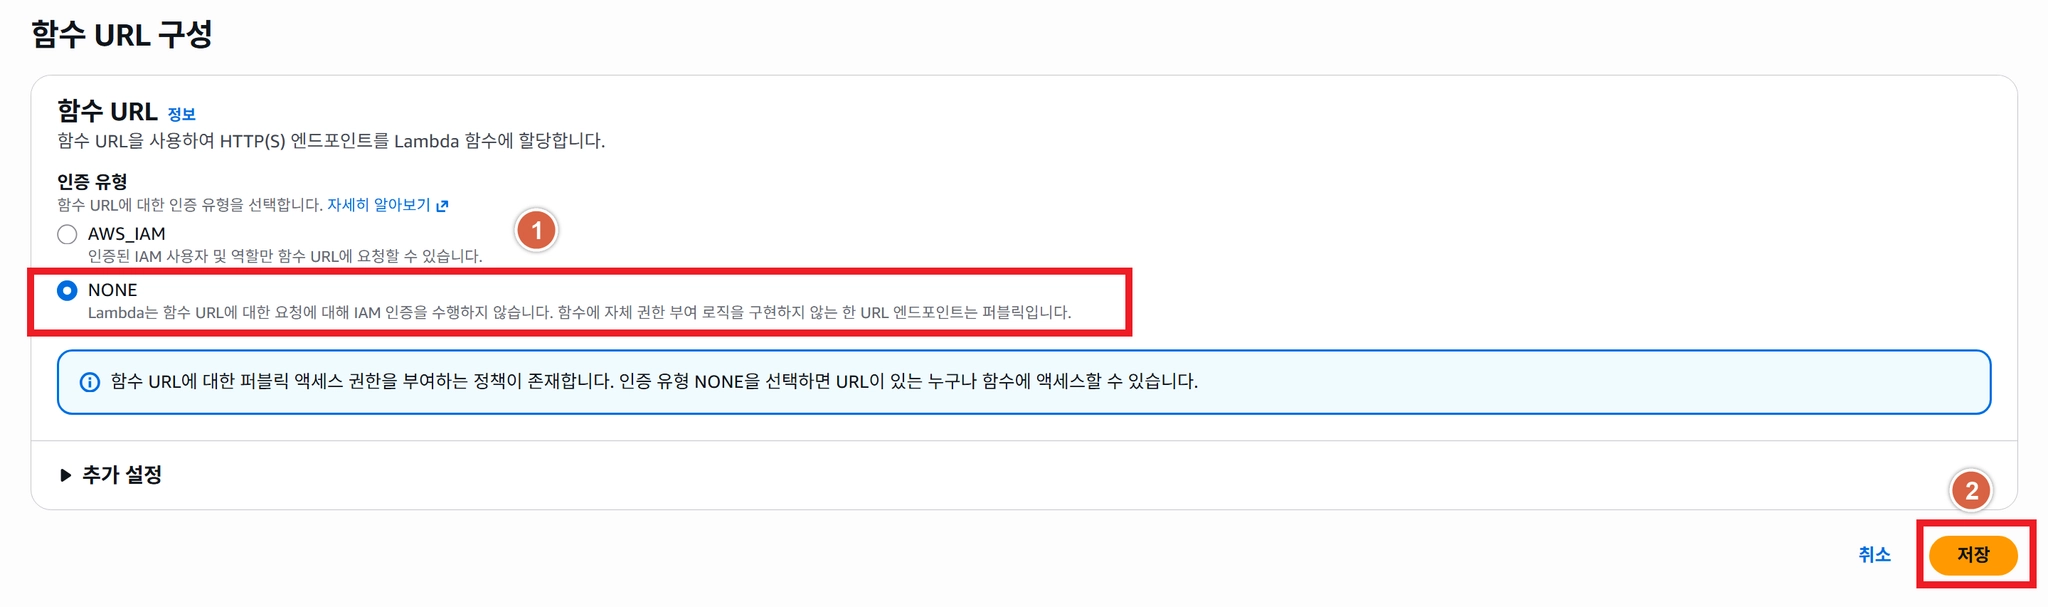
3번 : postman 로그인 진행 (사전 Postman 회원 가입 필요)
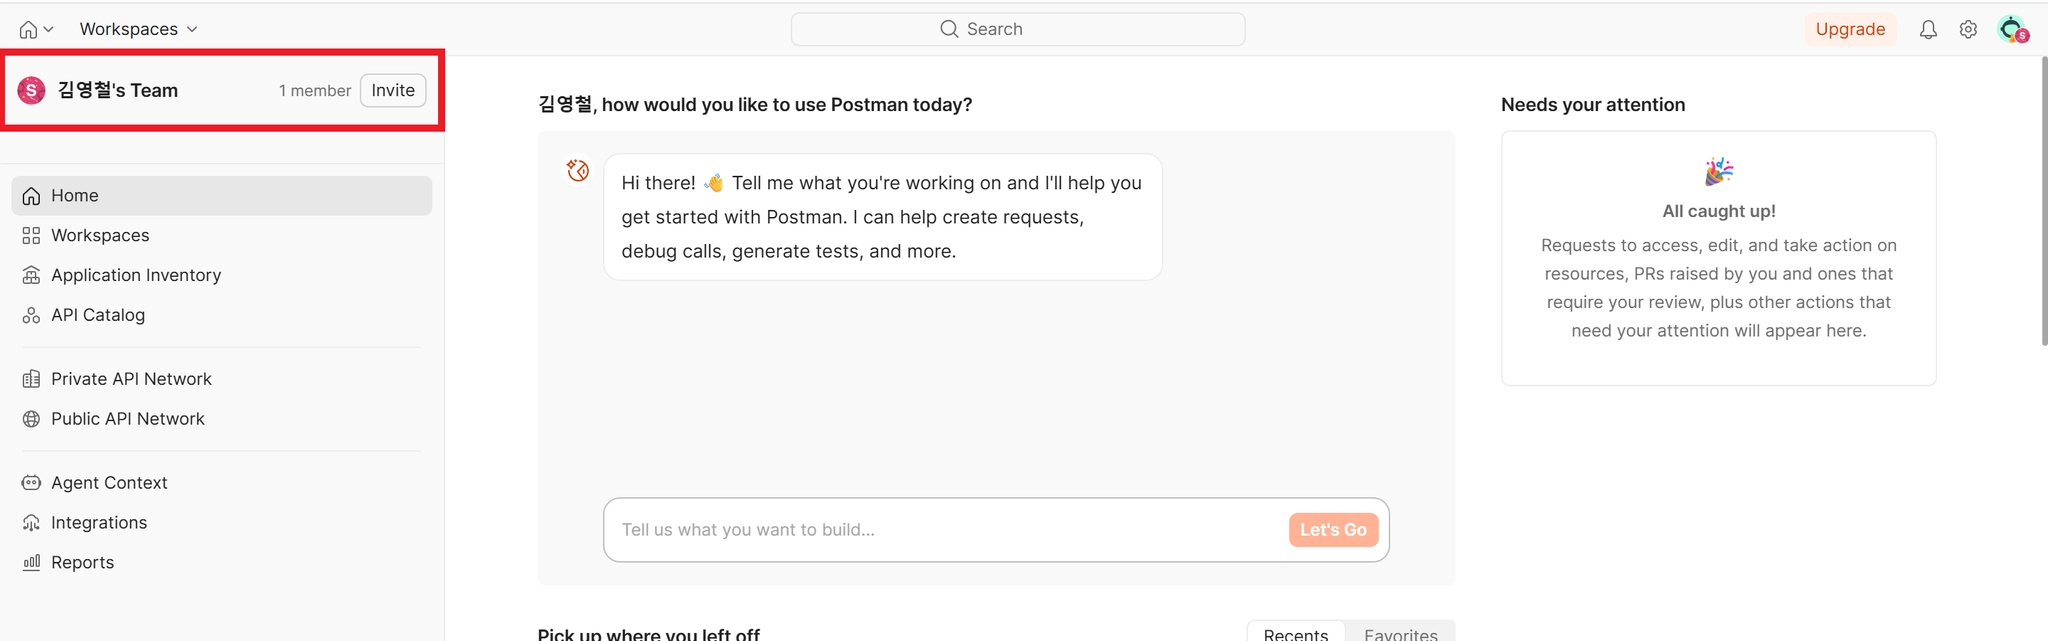
4번 : create workspace 생
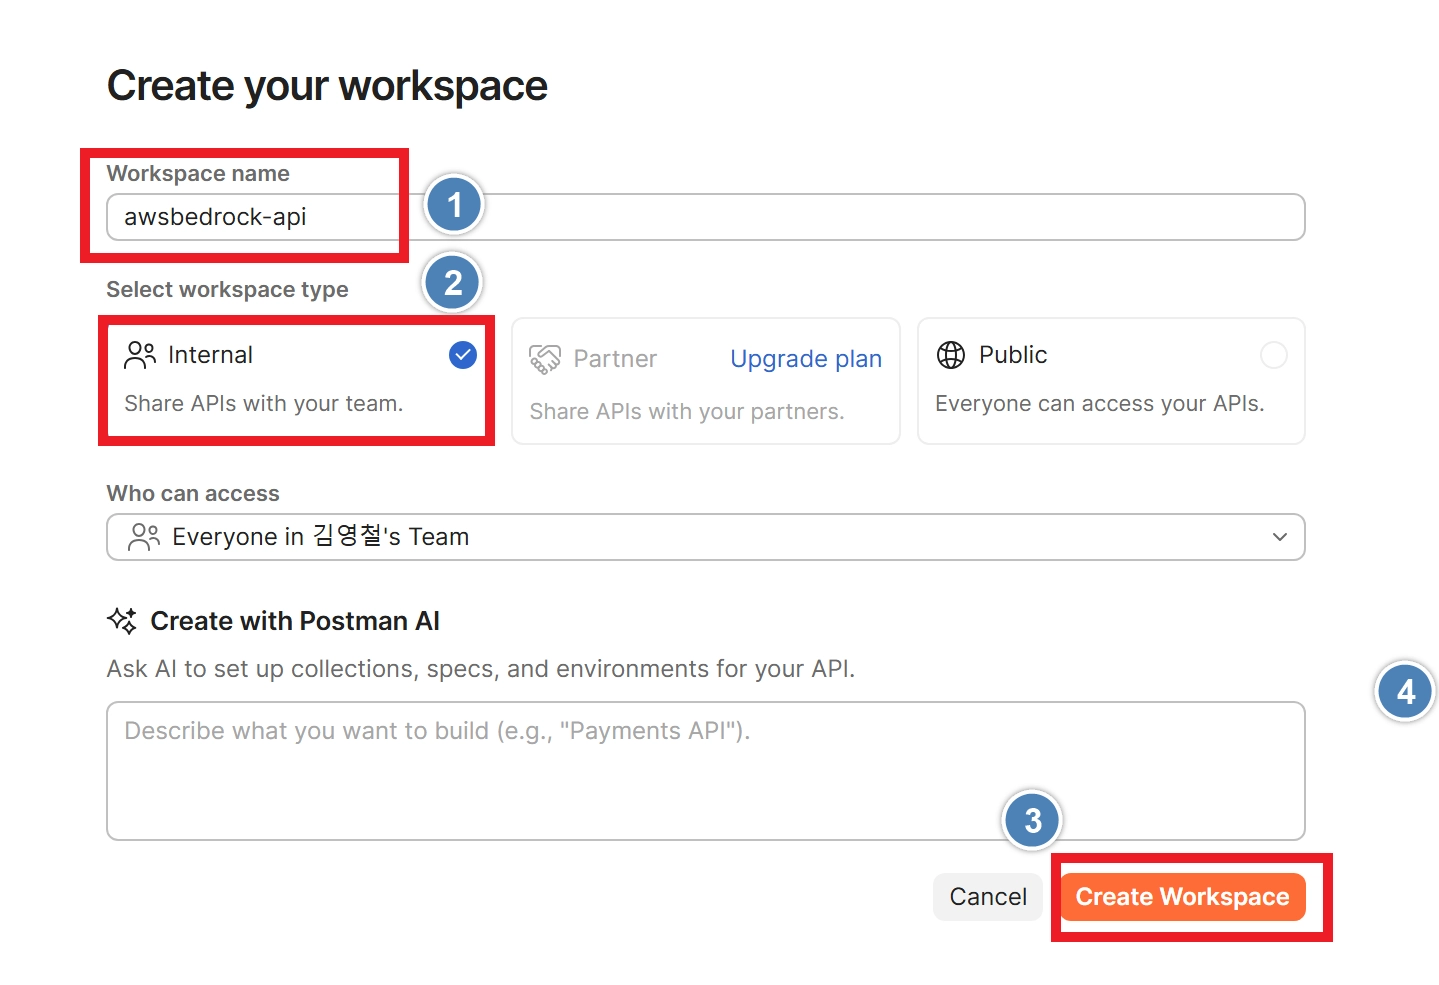
5번
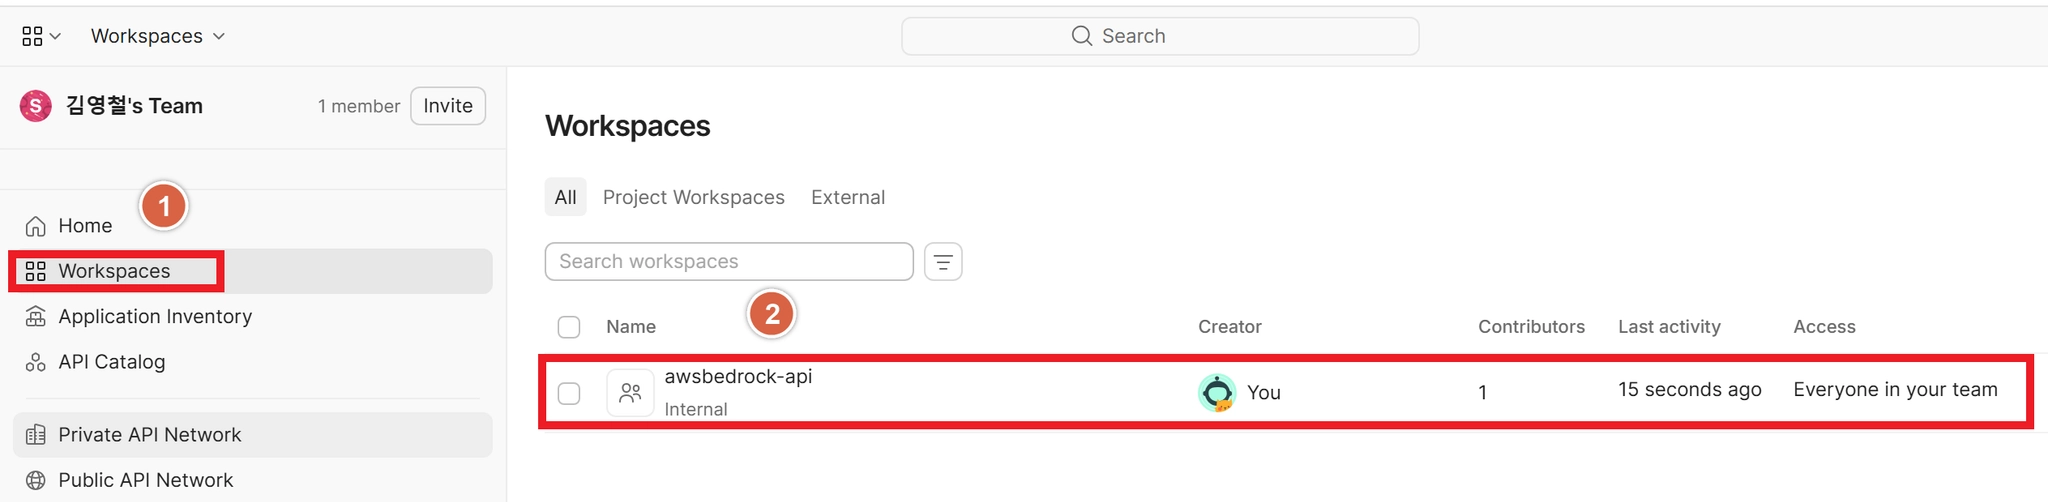
6번
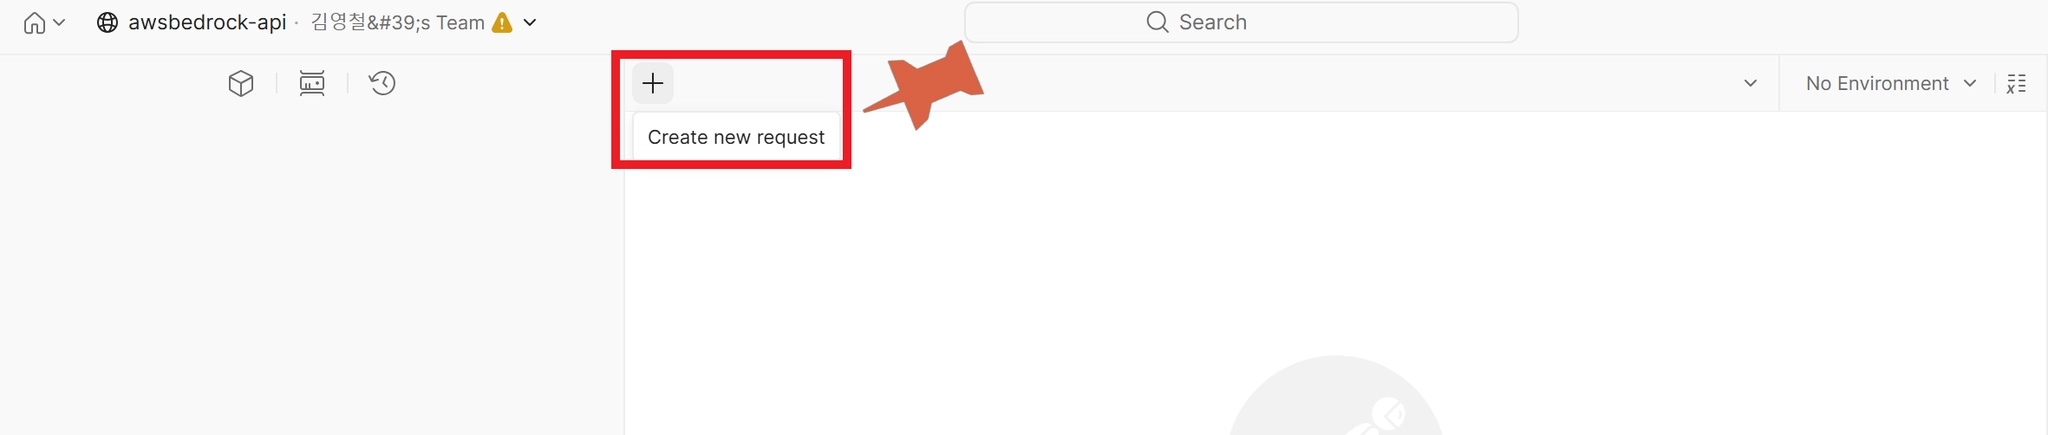
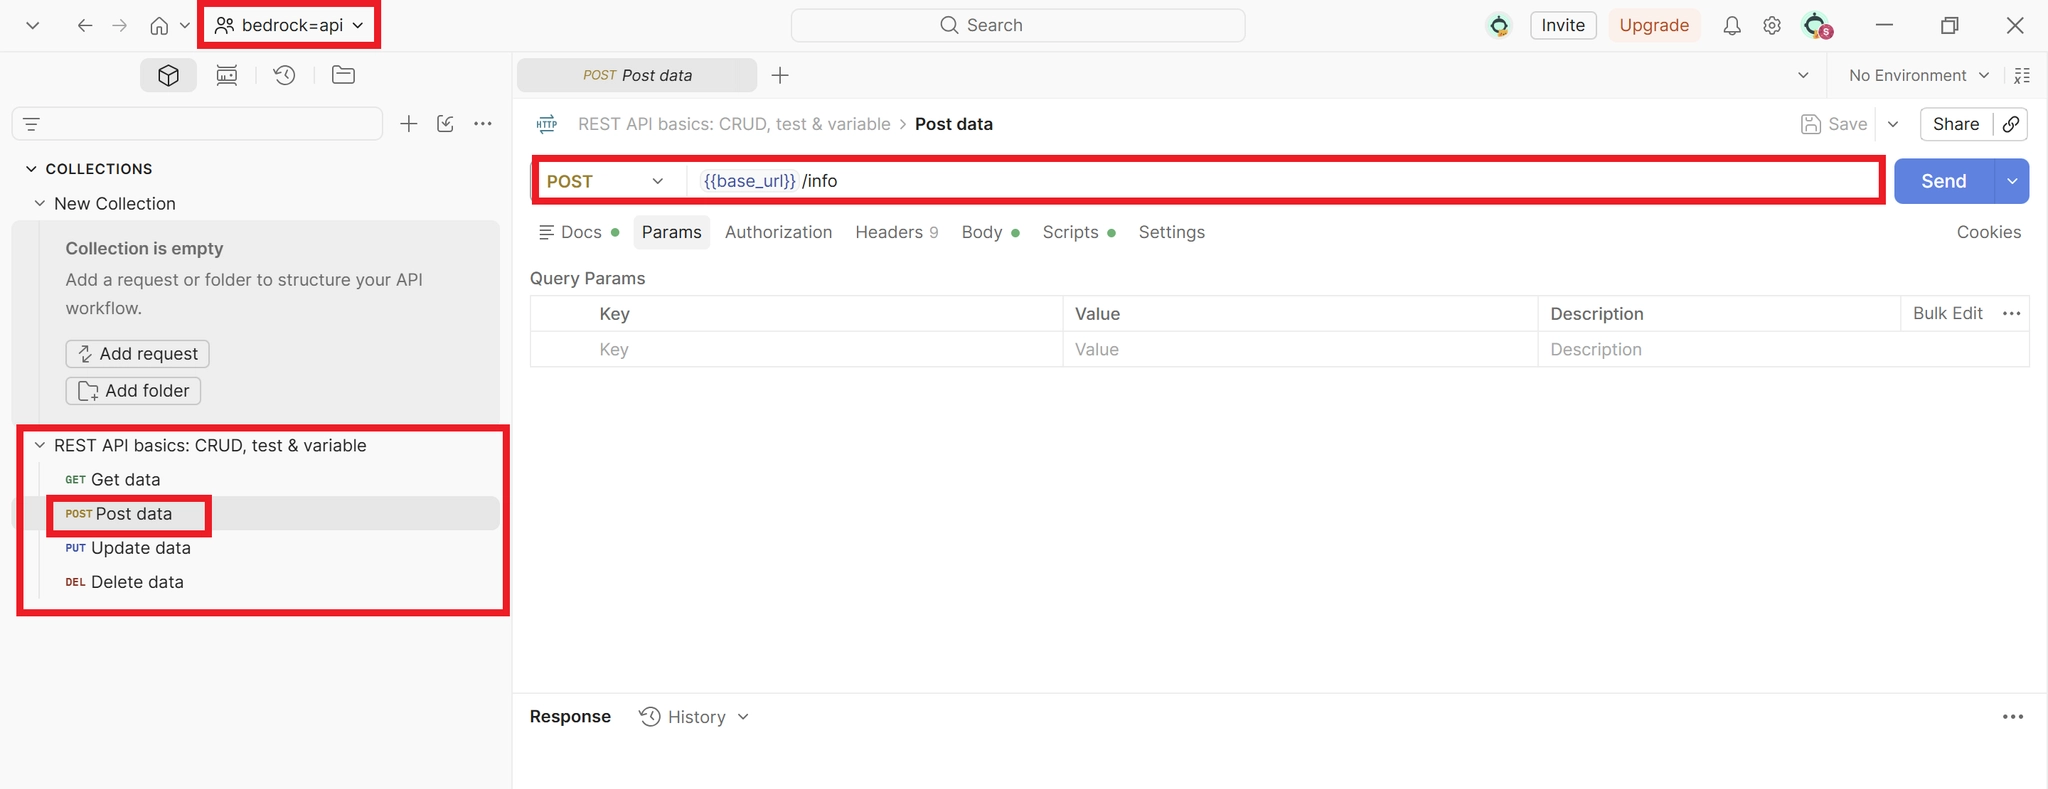
7번 테스트
•
실행조건 입력 값(1) 및 결과 값
{
"prompt" : "Amazon Bedrock 이 무엇인지 초보자가 이해하기 쉽게 셜명해주세요"
}
JavaScript
복사
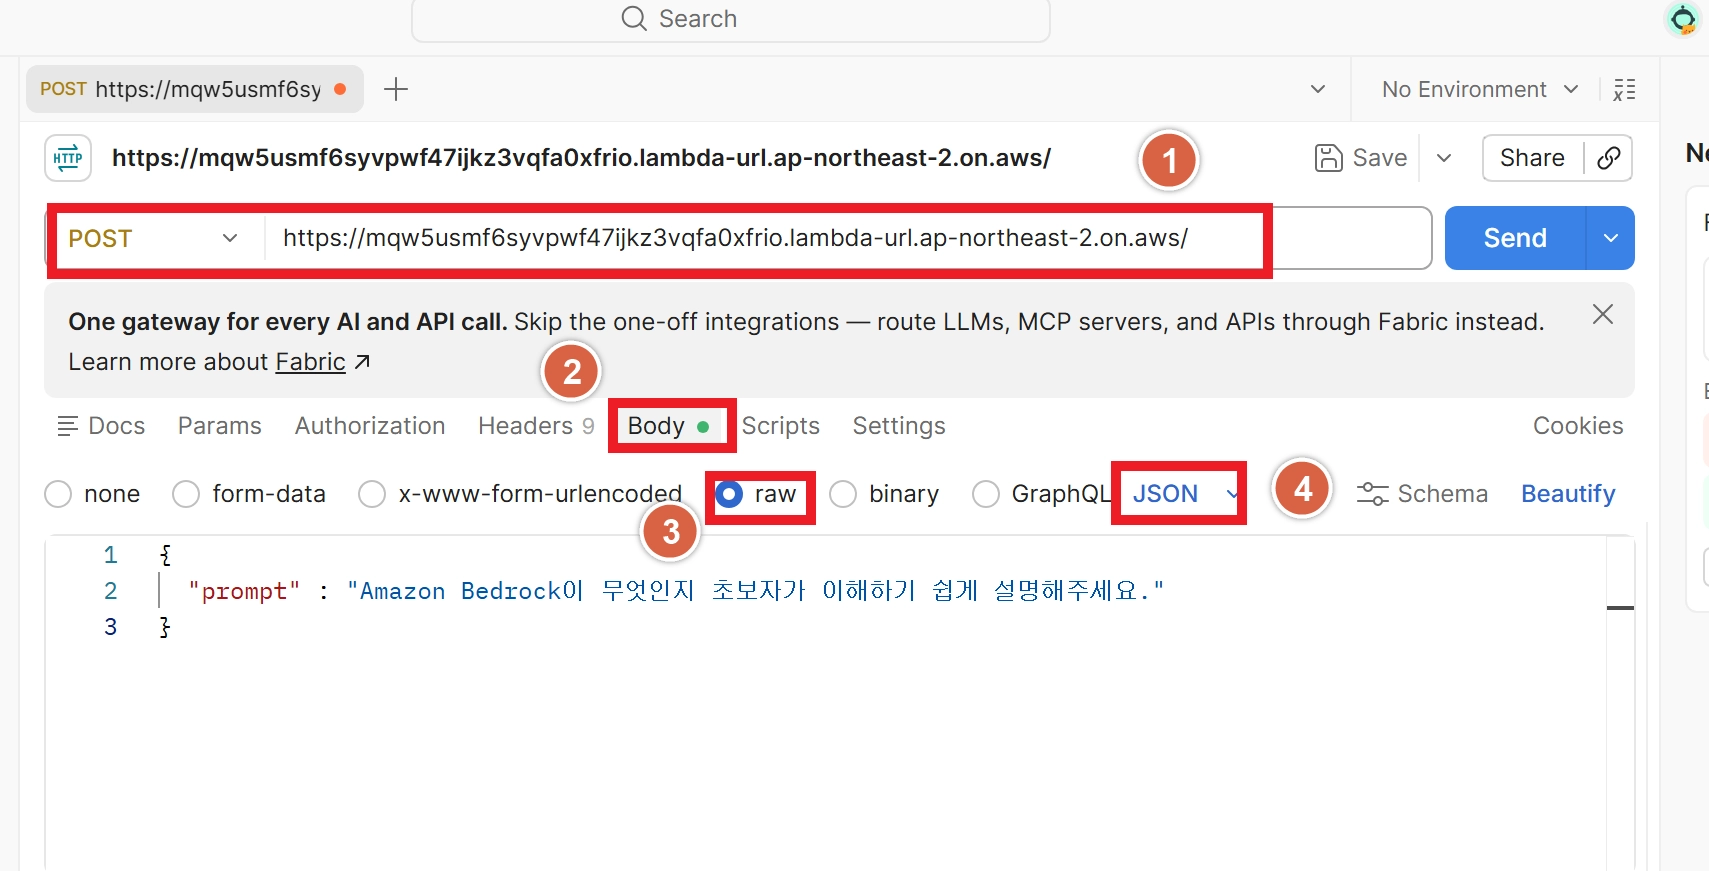
•
prompt 내용을 바꾸어서도 테스트 진행해보자.
•
실행조건 입력 값(2) 및 결과 값
{
"prompt" : "Amazon Bedrock langchain에 대해서 5줄로 요약해주세요."
}
JavaScript
복사
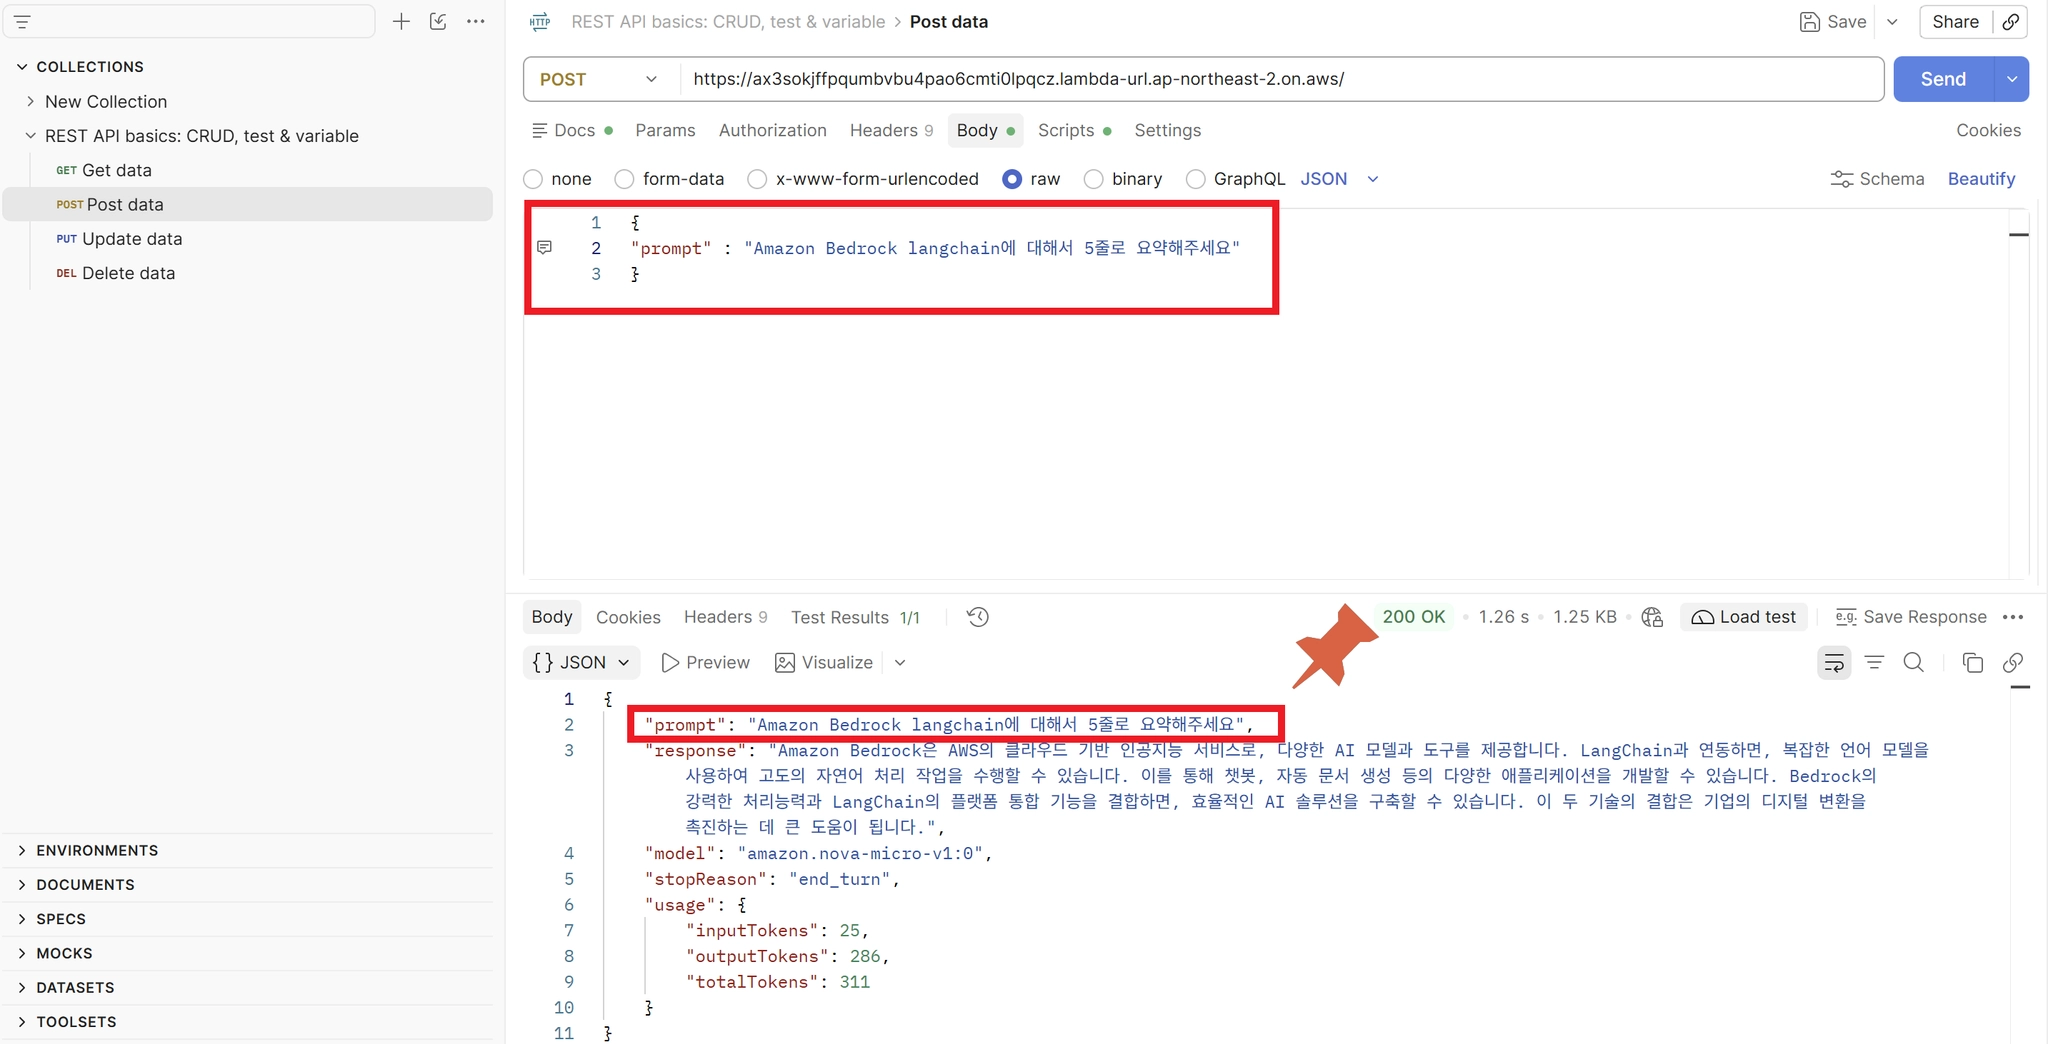
•
prompt 내용을 바꾸어서도 테스트 진행해보자.
•
실행조건 입력 값(3) 및 결과 값
{
"prompt" : "Amazon 람다 함수 핸들러에 대해 5줄이내로 설명해줘."
}
JavaScript
복사
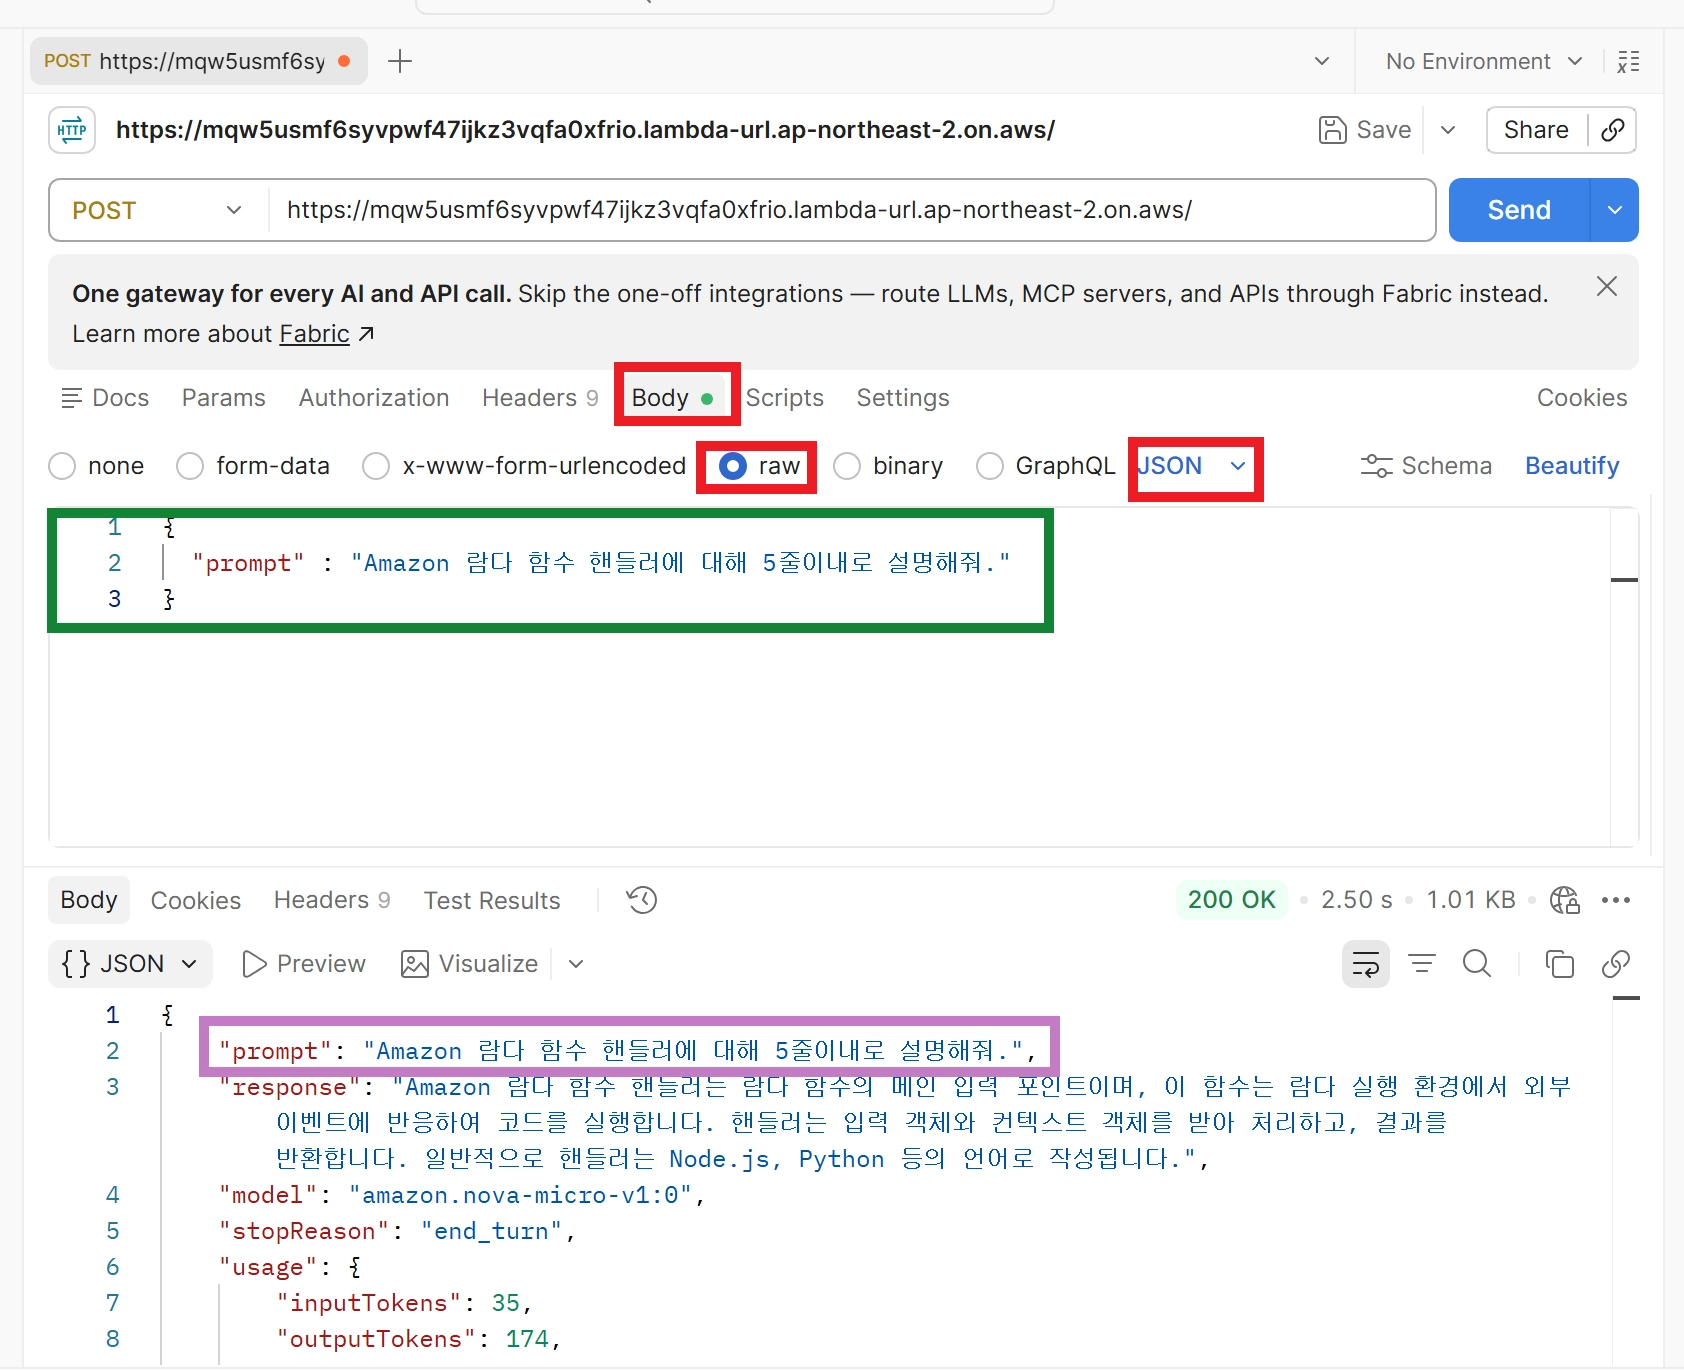
스트리밍 실행
streamlit run lambda_app.py
JavaScript
복사
C:\08.chatbot>streamlit run app.py
2026-09-16 19:13:14.451 Uvicorn server started on :::8501
You can now view your Streamlit app in your browser.
Local URL: http://localhost:8501
Network URL: http://192.168.0.50:8501
JavaScript
복사
브라우저에서 아래와 같이 챗봇이 생성되는것을 볼 수 있다.
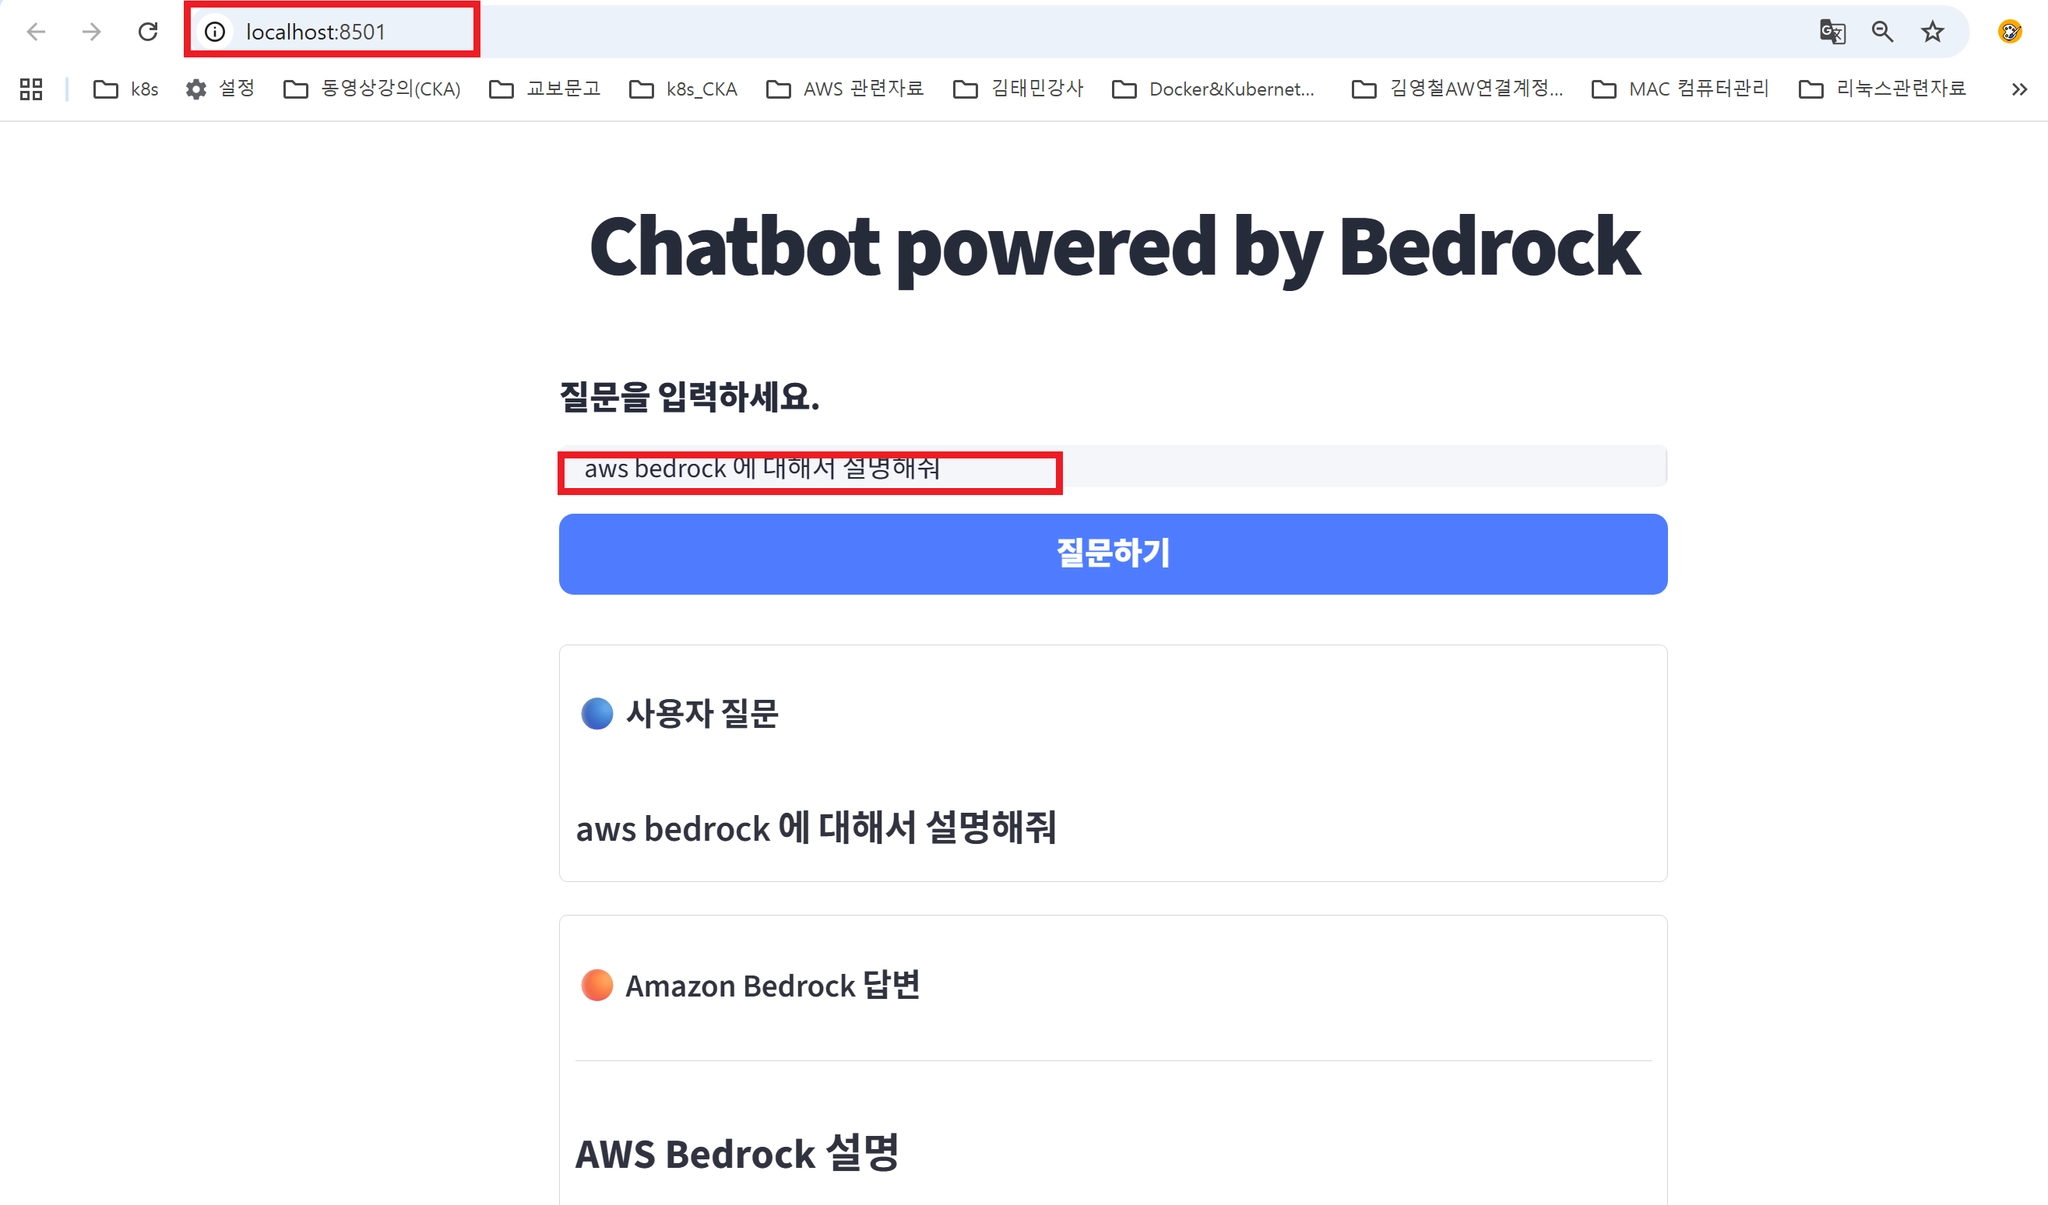
4. Amazon Bedrock 이미지 생성 예제코드
•
stable-image-generator.py
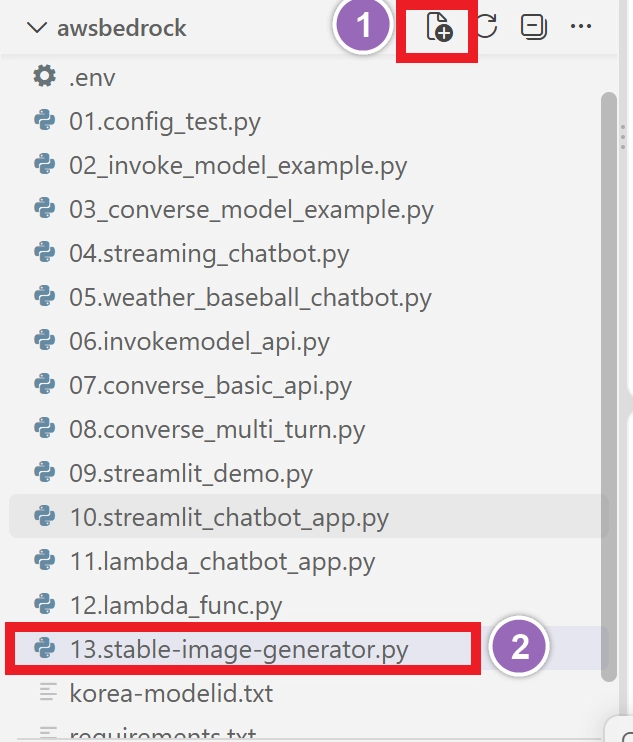
13.stable-image-generator.py
JavaScript
복사
# ============================================================
# Amazon Bedrock 이미지 생성 예제
# Stable Image Core + Python + boto3
# ============================================================
#
# [프로그램 동작 순서]
#
# 사용자 Prompt 입력
# ↓
# Python 프로그램
# ↓
# boto3
# ↓
# Amazon Bedrock Runtime
# ↓
# Stable Image Core 모델
# ↓
# 이미지 생성
# ↓
# Base64 문자열로 이미지 반환
# ↓
# Base64 → 실제 이미지 데이터 변환
# ↓
# output/cat.png 파일 저장
#
# ============================================================
# ============================================================
# 01. 필요한 Python 라이브러리 불러오기
# ============================================================
# boto3
# ------------------------------------------------------------
# Python 프로그램에서 AWS 서비스를 사용하기 위한
# AWS 공식 Python SDK입니다.
#
# 예:
# Python → S3
# Python → EC2
# Python → Lambda
# Python → Bedrock
#
# 여기서는 Amazon Bedrock을 호출하기 위해 사용합니다.
# ------------------------------------------------------------
import boto3
# json
# ------------------------------------------------------------
# Python Dictionary 데이터를 JSON 형식으로 변환하거나
# JSON 데이터를 Python Dictionary로 변환할 때 사용합니다.
#
# Bedrock API에 요청할 때 JSON 형식의 데이터를 사용합니다.
# ------------------------------------------------------------
import json
# base64
# ------------------------------------------------------------
# Bedrock에서 생성된 이미지는 일반 PNG 파일 형태가 아니라
# Base64라는 문자열 형태로 전달됩니다.
#
# 따라서 Base64 문자열을 실제 이미지 데이터로
# 변환하기 위해 사용합니다.
# ------------------------------------------------------------
import base64
# random
# ------------------------------------------------------------
# 이미지 생성에 사용할 Seed 값을 무작위로 만들기 위해 사용합니다.
#
# Seed가 달라지면 같은 Prompt라도
# 조금씩 다른 이미지가 만들어질 수 있습니다.
# ------------------------------------------------------------
import random
# os
# ------------------------------------------------------------
# 폴더를 생성하거나 파일 경로를 만들 때 사용합니다.
#
# 여기서는 output 폴더를 자동으로 만드는 데 사용합니다.
# ------------------------------------------------------------
import os
# ============================================================
# 02. Amazon Bedrock Runtime Client 생성
# ============================================================
#
# boto3.client()
#
# Python 프로그램에서 AWS 서비스와 통신할 수 있는
# Client 객체를 생성합니다.
#
# 쉽게 생각하면:
#
# Python
# ↓
# boto3 Client
# ↓
# AWS Bedrock
#
# 형태입니다.
#
# service_name="bedrock-runtime"
#
# 실제 Foundation Model을 호출하는 서비스입니다.
#
# region_name="us-west-2"
#
# 사용할 AWS Region을 지정합니다.
#
# us-west-2 = 미국 서부 Oregon Region
#
# ============================================================
bedrock = boto3.client(
service_name="bedrock-runtime",
region_name="us-west-2"
)
# ============================================================
# 03. 사용할 Bedrock 모델 지정
# ============================================================
#
# Amazon Bedrock에는 여러 Foundation Model이 있습니다.
#
# 예:
#
# Amazon Nova
# Anthropic Claude
# Stability AI
# Meta Llama
# 등
#
# 여기서는 Stability AI의 Stable Image Core를 사용합니다.
#
# 이전에 사용했던
#
# amazon.titan-image-generator-v2:0
#
# 은 EOL(End of Life) 상태가 되어
# 현재 호출 시 오류가 발생할 수 있기 때문에
# Stable Image Core를 사용합니다.
#
# ============================================================
model_id = "stability.stable-image-core-v1:1"
# ============================================================
# 04. 생성할 이미지 설명 작성
# ============================================================
#
# Prompt란?
#
# AI에게 "어떤 이미지를 만들어 주세요."라고
# 설명하는 명령문입니다.
#
# 이미지 생성 모델은 일반적으로 영어 Prompt가
# 안정적인 결과를 만드는 데 유리합니다.
#
# 아래 Prompt는:
#
# "소파 위에 앉아 있는 귀여운 검은 고양이,
# 사실적인 사진,
# 부드러운 자연광,
# 고품질"
#
# 정도의 의미입니다.
#
# ============================================================
prompt = """
A cute black cat sitting on a sofa,
realistic photography,
soft natural lighting,
high quality
"""
# ============================================================
# 05. Seed 값 만들기
# ============================================================
#
# Seed란?
#
# 이미지 생성 과정에서 사용하는 일종의
# "랜덤 시작 번호"라고 이해하면 됩니다.
#
# 같은 Prompt라도 Seed 값이 달라지면
# 다른 이미지가 만들어질 수 있습니다.
#
# random.randint()
#
# 지정한 범위에서 임의의 정수를 하나 만듭니다.
#
# ============================================================
seed = random.randint(
0,
4294967295
)
# ============================================================
# 06. Bedrock에 전달할 요청 데이터 만들기
# ============================================================
#
# Python의 Dictionary 형태로 요청 데이터를 작성합니다.
#
# 이후 이 데이터를 JSON으로 변환해서
# Amazon Bedrock에 전달합니다.
#
# ============================================================
request_body = {
# --------------------------------------------------------
# prompt
#
# 어떤 이미지를 만들 것인지 설명합니다.
# --------------------------------------------------------
"prompt": prompt,
# --------------------------------------------------------
# aspect_ratio
#
# 이미지의 가로 : 세로 비율입니다.
#
# 1:1
#
# → 정사각형 이미지
# --------------------------------------------------------
"aspect_ratio": "1:1",
# --------------------------------------------------------
# seed
#
# 이미지 생성에 사용할 랜덤 시작값입니다.
# --------------------------------------------------------
"seed": seed,
# --------------------------------------------------------
# output_format
#
# 생성할 이미지 파일 형식을 지정합니다.
#
# png
# jpeg
# 등을 사용할 수 있습니다.
# --------------------------------------------------------
"output_format": "png"
}
# ============================================================
# 07. Python Dictionary → JSON 변환
# ============================================================
#
# 현재 request_body는 Python Dictionary입니다.
#
# 예:
#
# {
# "prompt": "...",
# "aspect_ratio": "1:1"
# }
#
# Bedrock API에는 JSON 형태로 전달해야 하므로
#
# json.dumps()
#
# 를 사용해서 JSON 문자열로 변환합니다.
#
# ============================================================
request = json.dumps(request_body)
# ============================================================
# 08. 사용자에게 진행 상태 출력
# ============================================================
print("======================================")
print("Amazon Bedrock 이미지 생성")
print("======================================")
print()
print("이미지를 생성하고 있습니다...")
# ============================================================
# 09. 예외 처리를 위한 try 시작
# ============================================================
#
# AWS API를 호출할 때는 여러 오류가 발생할 수 있습니다.
#
# 예:
#
# AWS 인증 오류
# IAM 권한 오류
# 모델 ID 오류
# Region 오류
# 네트워크 오류
#
# 프로그램이 바로 종료되지 않고 오류 내용을 보여주기 위해
# try / except를 사용합니다.
#
# ============================================================
try:
# ========================================================
# 10. Amazon Bedrock 모델 호출
# ========================================================
#
# invoke_model()
#
# Bedrock Foundation Model을 직접 호출하는 API입니다.
#
# modelId
#
# → 어떤 모델을 사용할 것인지 지정
#
# body
#
# → 모델에게 전달할 Prompt 및 설정
#
# 전체 흐름:
#
# Python
# ↓
# boto3
# ↓
# invoke_model()
# ↓
# Amazon Bedrock
# ↓
# Stable Image Core
#
# ========================================================
response = bedrock.invoke_model(
modelId=model_id,
body=request
)
# ========================================================
# 11. Bedrock 응답 읽기
# ========================================================
#
# Bedrock에서 받은 response에는 여러 정보가 들어 있습니다.
#
# 실제 모델의 결과는
#
# response["body"]
#
# 안에 있습니다.
#
# .read()
#
# 를 이용해서 데이터를 읽습니다.
#
# json.loads()
#
# 를 사용하여 JSON 데이터를
# Python Dictionary로 변환합니다.
#
# ========================================================
response_body = json.loads(
response["body"].read()
)
# ========================================================
# 12. 생성된 이미지 데이터 가져오기
# ========================================================
#
# Stable Image Core의 응답에는
# 생성된 이미지가 images 배열에 들어 있습니다.
#
# 대략 다음과 같은 구조입니다.
#
# {
# "images": [
# "iVBORw0KGgoAAA..."
# ]
# }
#
# images[0]
#
# → 첫 번째 생성 이미지를 가져옵니다.
#
# 중요한 점:
#
# 이것은 아직 PNG 파일이 아닙니다.
#
# Base64로 인코딩된 문자열입니다.
#
# ========================================================
base64_image = response_body["images"][0]
# ========================================================
# 13. Base64 → 실제 이미지 데이터 변환
# ========================================================
#
# Bedrock
#
# Base64 문자열
#
# ↓
#
# base64.b64decode()
#
# ↓
#
# Binary 이미지 데이터
#
# 로 변환합니다.
#
# ========================================================
image_data = base64.b64decode(
base64_image
)
# ========================================================
# 14. 이미지를 저장할 output 폴더 지정
# ========================================================
output_folder = "output"
# ========================================================
# 15. output 폴더 생성
# ========================================================
#
# os.makedirs()
#
# 폴더가 없으면 새로 만듭니다.
#
# exist_ok=True
#
# 이미 output 폴더가 존재해도
# 오류를 발생시키지 않습니다.
#
# ========================================================
os.makedirs(
output_folder,
exist_ok=True
)
# ========================================================
# 16. 저장할 이미지 파일 경로 만들기
# ========================================================
#
# 결과:
#
# output\cat.png
#
# Windows에서 os.path.join()을 사용하면
# 운영체제에 맞게 경로를 만들어 줍니다.
#
# ========================================================
image_path = os.path.join(
output_folder,
"cat.png"
)
# ========================================================
# 17. 실제 PNG 이미지 파일 저장
# ========================================================
#
# open()
#
# 파일을 열거나 생성합니다.
#
# "wb"
#
# w = write
# b = binary
#
# 즉,
#
# "Binary 데이터를 파일에 쓰겠다"
#
# 라는 의미입니다.
#
# 이미지 파일은 Binary 데이터이기 때문에
# "wb"를 사용해야 합니다.
#
# ========================================================
with open(image_path, "wb") as file:
file.write(image_data)
# ========================================================
# 18. 이미지 생성 성공 메시지 출력
# ========================================================
print()
print("======================================")
print("이미지 생성 완료!")
print("======================================")
print()
print("Prompt:")
print(prompt)
print("사용 모델:", model_id)
print("Seed:", seed)
print("저장 위치:", image_path)
# ============================================================
# 19. 오류가 발생했을 경우
# ============================================================
#
# try 부분에서 오류가 발생하면
# 아래 except 부분이 실행됩니다.
#
# ============================================================
except Exception as e:
print()
print("======================================")
print("이미지 생성 오류")
print("======================================")
print()
print(e)
JavaScript
복사
python stable-image-generator.py
JavaScript
복사
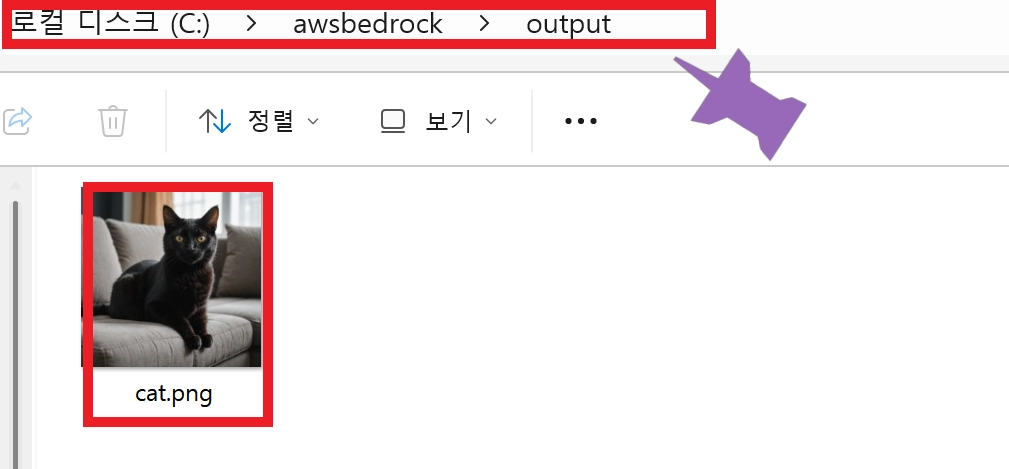
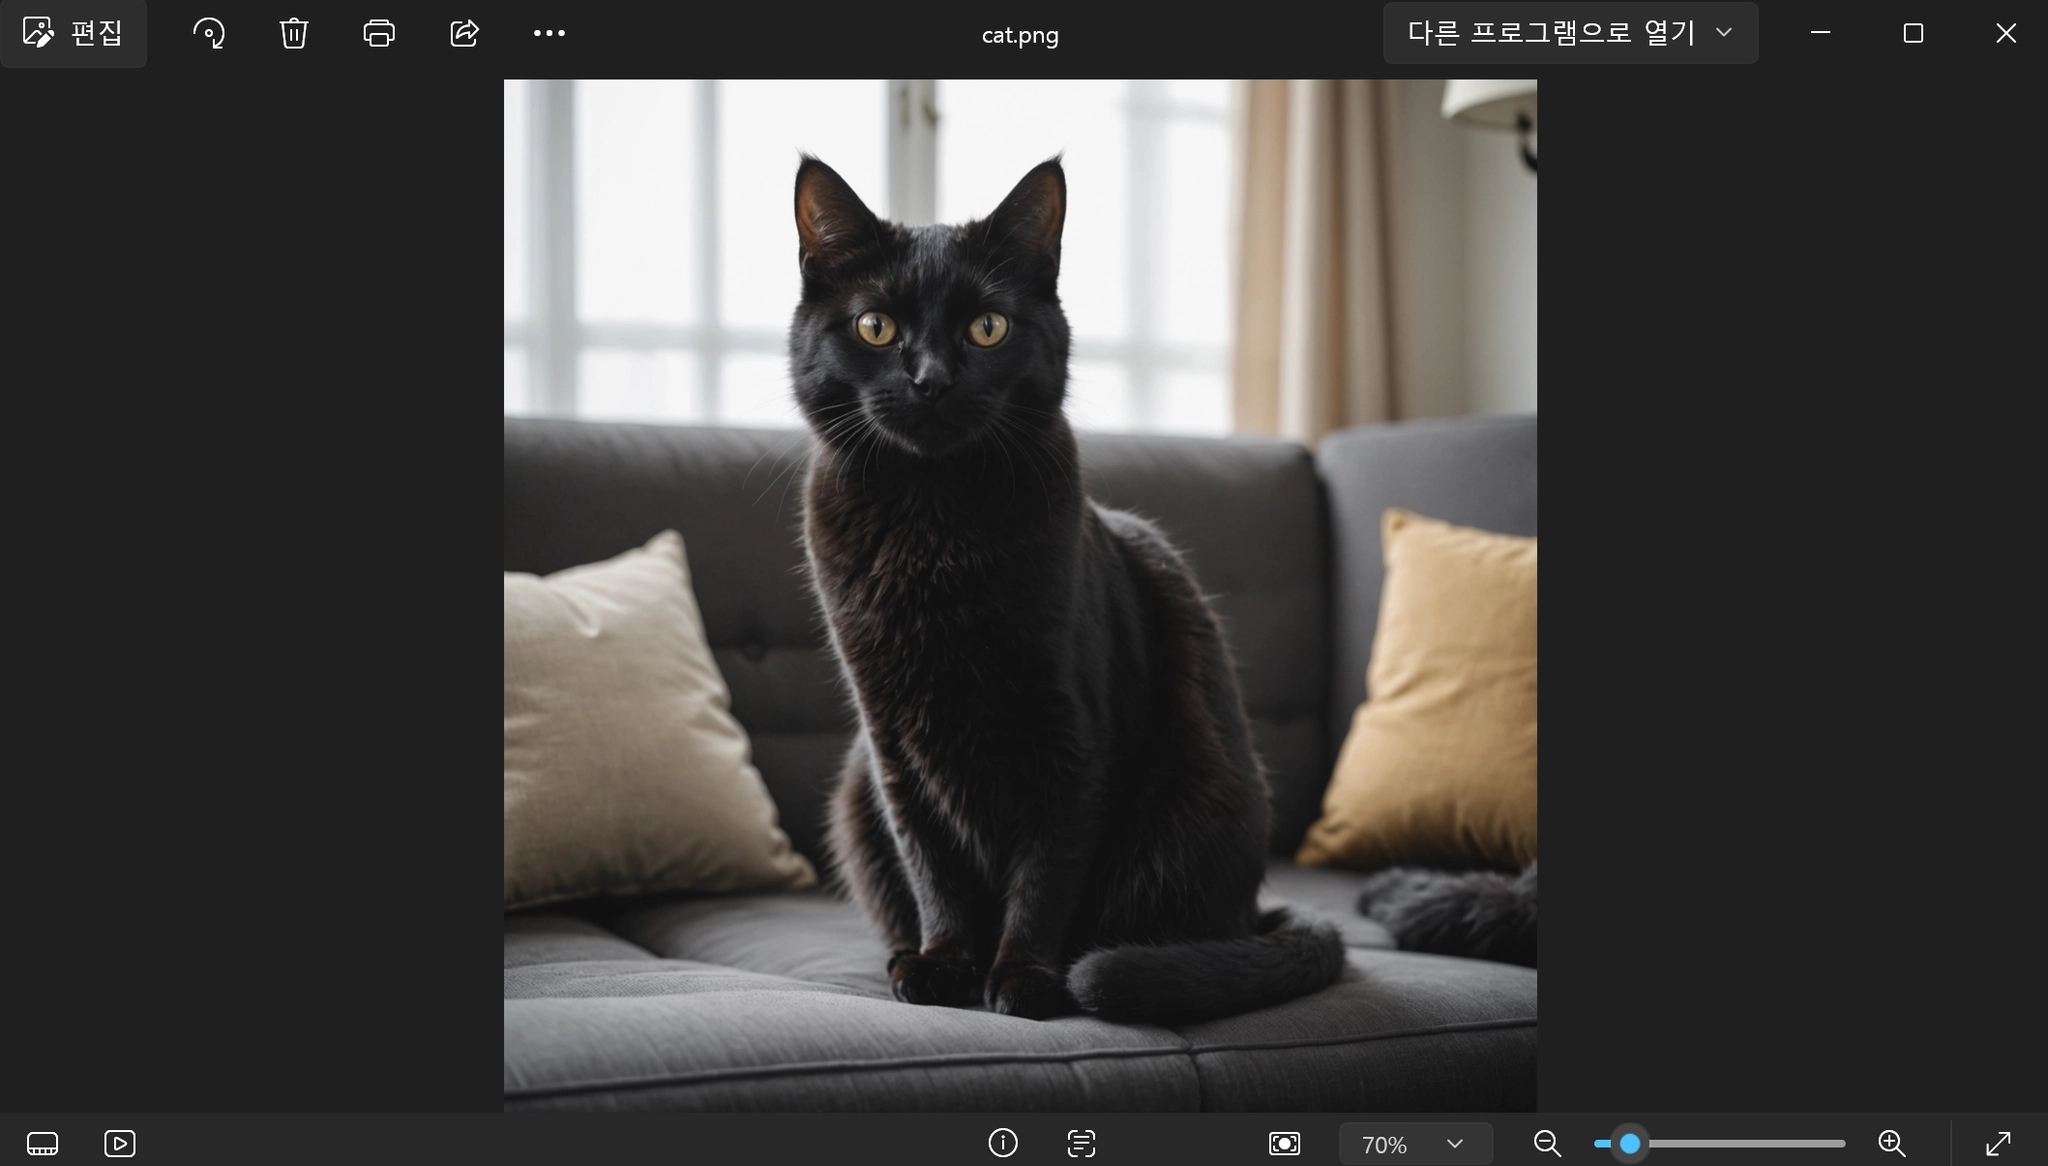
(.venv) C:\awsbedrock>streamlit run 13.stable-image-generator.py
2026-11-10 14:33:14.272 Uvicorn server started on :::8501
You can now view your Streamlit app in your browser.
Local URL: http://localhost:8501
Network URL: http://192.168.0.29:8501
Help agents write better Streamlit apps?
Install the official Streamlit skills by running streamlit skills in your terminal.
======================================
Amazon Bedrock 이미지 생성
======================================
이미지를 생성하고 있습니다...
======================================
이미지 생성 완료!
======================================
Prompt:
A cute black cat sitting on a sofa,
realistic photography,
soft natural lighting,
high quality
사용 모델: stability.stable-image-core-v1:1
Seed: 2808887046
저장 위치: output\cat.png
Stopping...
(.venv) C:\awsbedrock>
JavaScript
복사